So, today I wanted to create a CentOS VM, prepared beforehand, without any ISO, redistributable.
As you all know, it is a great PITA, when it comes to grub v0.97 and CentOS < 7. So I let go of grub and embraced extlinux.
So, here is how I was able to achieve this:
This method was tested on a host machine running CentOS 6.6
First, create the virtual disk.
Find a free loop device and map the image to it automatically:
As you all know, it is a great PITA, when it comes to grub v0.97 and CentOS < 7. So I let go of grub and embraced extlinux.
So, here is how I was able to achieve this:
This method was tested on a host machine running CentOS 6.6
First, create the virtual disk.
/t/centos ❯❯❯ truncate -s 10G centos6.imgYeah, I know, one can use "qemu-img create -f raw centos6.img 10G" too.
Find a free loop device and map the image to it automatically:
/t/centos ❯❯❯ kpartx -va centos6.imgFind out which loopback interface was our image mapped to:
/t/centos ❯❯❯ losetup -a
/dev/loop0: [0802]:402326 (centos6.img)
Write a DOS partition table:
/t/centos ❯❯❯ fdisk /dev/loop0
Device contains neither a valid DOS partition table, nor Sun, SGI or OSF disklabel
Building a new DOS disklabel with disk identifier 0x9958dbf2.
Changes will remain in memory only, until you decide to write them.
After that, of course, the previous content won't be recoverable.

Warning: invalid flag 0x0000 of partition table 4 will be corrected by w(rite)

WARNING: DOS-compatible mode is deprecated. It's strongly recommended to
         switch off the mode (command 'c') and change display units to
         sectors (command 'u').

Command (m for help): w
The partition table has been altered!

Calling ioctl() to re-read partition table.

WARNING: Re-reading the partition table failed with error 22: Invalid argument.
The kernel still uses the old table. The new table will be used at
the next reboot or after you run partprobe(8) or kpartx(8)
Syncing disks.
Let us create a partition and mark it bootable:
/t/centos ❯❯❯ fdisk /dev/loop0

WARNING: DOS-compatible mode is deprecated. It's strongly recommended to
         switch off the mode (command 'c') and change display units to
         sectors (command 'u').

Command (m for help): n
Command action
   e   extended
   p   primary partition (1-4)
p
Partition number (1-4): 1
First cylinder (1-1305, default 1):
Using default value 1
Last cylinder, +cylinders or +size{K,M,G} (1-1305, default 1305):
Using default value 1305

Command (m for help): p

Disk /dev/loop0: 10.7 GB, 10737418240 bytes
255 heads, 63 sectors/track, 1305 cylinders
Units = cylinders of 16065 * 512 = 8225280 bytes
Sector size (logical/physical): 512 bytes / 512 bytes
I/O size (minimum/optimal): 512 bytes / 512 bytes
Disk identifier: 0x402195a6

      Device Boot      Start         End      Blocks   Id  System
/dev/loop0p1               1        1305    10482381   83  Linux

Command (m for help): a
Partition number (1-4): 1

Command (m for help): p

Disk /dev/loop0: 10.7 GB, 10737418240 bytes
255 heads, 63 sectors/track, 1305 cylinders
Units = cylinders of 16065 * 512 = 8225280 bytes
Sector size (logical/physical): 512 bytes / 512 bytes
I/O size (minimum/optimal): 512 bytes / 512 bytes
Disk identifier: 0x402195a6

      Device Boot      Start         End      Blocks   Id  System
/dev/loop0p1   *           1        1305    10482381   83  Linux

Command (m for help): w
The partition table has been altered!

Calling ioctl() to re-read partition table.

WARNING: Re-reading the partition table failed with error 22: Invalid argument.
The kernel still uses the old table. The new table will be used at
the next reboot or after you run partprobe(8) or kpartx(8)
Syncing disks.
[root@ibm2 wani]/t/centos ❯❯❯ fdisk /dev/loop0 -l

Disk /dev/loop0: 10.7 GB, 10737418240 bytes
255 heads, 63 sectors/track, 1305 cylinders
Units = cylinders of 16065 * 512 = 8225280 bytes
Sector size (logical/physical): 512 bytes / 512 bytes
I/O size (minimum/optimal): 512 bytes / 512 bytes
Disk identifier: 0x402195a6

      Device Boot      Start         End      Blocks   Id  System
/dev/loop0p1   *           1        1305    10482381   83  Linux
Verify that a new, bootable partition has been created:
]/t/centos ❯❯❯ fdisk /dev/loop0 -l

Disk /dev/loop0: 10.7 GB, 10737418240 bytes
255 heads, 63 sectors/track, 1305 cylinders
Units = cylinders of 16065 * 512 = 8225280 bytes
Sector size (logical/physical): 512 bytes / 512 bytes
I/O size (minimum/optimal): 512 bytes / 512 bytes
Disk identifier: 0x402195a6

      Device Boot      Start         End      Blocks   Id  System
/dev/loop0p1   *           1        1305    10482381   83  Linux
Run kpartx again, to map the newly created partition as another loop device
/t/centos ❯❯❯ kpartx -va centos6.img
add map loop0p1 (253:0): 0 20964762 linear /dev/loop0 63
Format the newly created partition to ext4 filesystem.
/t/centos ❯❯❯ mkfs.ext4 /dev/mapper/loop0p1
mke2fs 1.41.12 (17-May-2010)
Discarding device blocks: done
Filesystem label=
OS type: Linux
Block size=4096 (log=2)
Fragment size=4096 (log=2)
Stride=0 blocks, Stripe width=0 blocks
655360 inodes, 2620595 blocks
131029 blocks (5.00%) reserved for the super user
First data block=0
Maximum filesystem blocks=2684354560
80 block groups
32768 blocks per group, 32768 fragments per group
8192 inodes per group
Superblock backups stored on blocks:
 32768, 98304, 163840, 229376, 294912, 819200, 884736, 1605632

Writing inode tables: done
Creating journal (32768 blocks): done
Writing superblocks and filesystem accounting information: done

This filesystem will be automatically checked every 30 mounts or
180 days, whichever comes first.  Use tune2fs -c or -i to override.
Mount the new partition to /mnt/mycentos6/
/t/centos ❯❯❯ mkdir -p /mnt/mycentos6/; mount /dev/mapper/loop0p1 /mnt/mycentos6/Install syslinux-extlinux (bootloader) and mock (a simple program that helps in building source RPMs inside a chroot)
/t/centos ❯❯❯ yum install -y mock syslinux-extlinuxInitialize a directory structure for epel6 family.
/t/centos ❯❯❯ sudo mock --init -v -r epel-6-x86_64
/t/centos ❯❯❯ #For configuring stuff, edit the file /etc/mock/epel-6-x86_64.cfg or create a copy of it and play with it.
Copy all mock files to your disk image:
/t/centos ❯❯❯ cp -r /var/lib/mock/epel-6-x86_64/root/* /mnt/mycentos6/Create a directory for syslinux.
/t/centos ❯❯❯ mkdir /mnt/mycentos6/boot/syslinux;Note the UUID of the new partition
/t/centos ❯❯❯ blkid /dev/mapper/loop0p1
/dev/mapper/loop0p1: UUID="02afc1b5-66b4-4931-9411-6123a6d1f152" TYPE="ext4"
Setup /etc/fstab
/t/centos ❯❯❯ tee /mnt/mycentos6/etc/fstab <<EOF
UUID=02afc1b5-66b4-4931-9411-6123a6d1f152 /                       ext4    defaults        1 1
EOF
Create a configuration file for extlinux
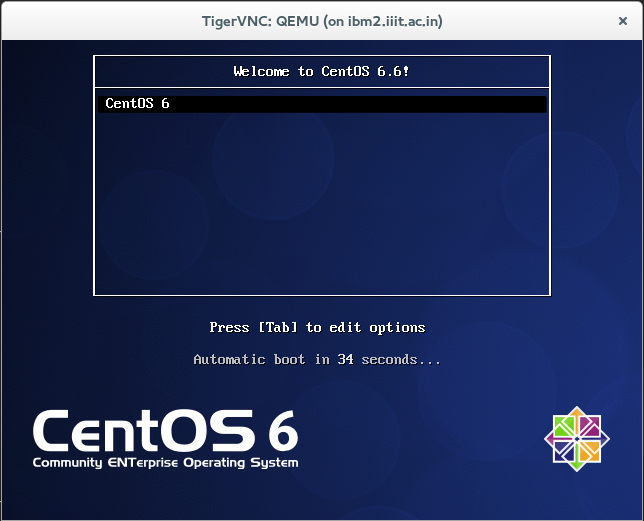
/t/centos ❯❯❯ tee /mnt/mycentos6/boot/syslinux/extlinux.conf <<EOF
default vesamenu.c32
timeout 600

display boot.msg

menu background splash.jpg
menu title Welcome to CentOS 6.6!
menu color border 0 #ffffffff #00000000
menu color sel 7 #ffffffff #ff000000
menu color title 0 #ffffffff #00000000
menu color tabmsg 0 #ffffffff #00000000
menu color unsel 0 #ffffffff #00000000
menu color hotsel 0 #ff000000 #ffffffff
menu color hotkey 7 #ffffffff #ff000000
menu color scrollbar 0 #ffffffff #00000000

label CentOS 6
  menu label CentOS 6
  menu default
  kernel /boot/vmlinuz-2.6.32-504.12.2.el6.x86_64 root=UUID=02afc1b5-66b4-4931-9411-6123a6d1f152
  append initrd=/boot/initramfs-2.6.32-504.12.2.el6.x86_64.img
EOF
Copy files required for menu, etc
/t/centos ❯❯❯ cp /usr/share/syslinux/vesamenu.c32 /mnt/mycentos6/boot/syslinux/
/t/centos ❯❯❯ cp /mnt/mycentos6/usr/lib/anaconda-runtime/syslinux-vesa-splash.jpg /mnt/mycentos6/boot/syslinux/splash.jpg
Install MBR code that boots from the partition marked as bootable. The syslinux family comes with such a MBR code, so we use it:
/t/centos ❯❯❯ dd if=/usr/share/syslinux/mbr.bin of=centos6.img conv=notruncInstall extlinux
/t/centos ❯❯❯ extlinux --install /mnt/mycentos6/boot/syslinux
/mnt/mycentos6/boot/syslinux is device /dev/mapper/loop0p1
Unmount the partition
/t/centos ❯❯❯ umount /mnt/mycentos6/Delete device mapping
/t/centos ❯❯❯ kpartx -vd centos6.img
del devmap : loop0p1
loop deleted : /dev/loop0
Lets test this! Mr. Qemu, hit it!
/t/centos ❯❯❯ /usr/libexec/qemu-kvm centos6.img
VNC server running on `::1:5900'
And... we have what we want:
/t/centos ❯❯❯ vncviewer :5900

TigerVNC Viewer for X version 1.1.0 - built Oct 30 2014 12:44:50
Copyright (C) 1999-2011 TigerVNC Team and many others (see README.txt)
See http://www.tigervnc.org for information on TigerVNC.
No comments:
Post a Comment